JavaScript
JavaScript
JavaScript is the programming language of the web.
It can update and change both HTML and CSS.
It can calculate, manipulate and validate data.
extension - .js
Single line comments start with //.
Multi-line comments start with /* and end with */.
JavaScript is a case sensitive language.
TypeScript
JavaScript is a dynamically typed language used for web development, whereas TypeScript is a superset of JavaScript that adds static typing, making code more maintainable and reducing runtime errors; however, TypeScript requires compilation (.ts → .js) before execution.
JavaScript (dynamic, quick for small tasks) vs. TypeScript (adds static types, catches errors early, scales for large apps). TS compiles to JS but boosts code safety and teamwork. Use JS for simplicity, TS for complex projects. We can also learn TypeScript in future.
How to use
Internal : JavaScript code is inserted between <script> code </script> tags.
You can place any number of scripts in an HTML document.
Scripts can be placed in the body, or in the head section of an HTML page, or in both.
External : External scripts are practical when the same code is used in many different web pages.
JavaScript files have the file extension .js.
To use an external script, put the name or path of the script file in the src (source) attribute of a <script> tag: <script src="app.js"></script>
You can place an external script reference in head or body as you like. But best practice is At the End of body(The page content loads first, preventing render-blocking delays.).
Variables
variables are used to store data values. JavaScript provides three main ways to declare variables: let, const, and var.
let
let age = 25; or let age; e.t.c
let is block-scoped, meaning it is only accessible within the block (or curly braces) where it is declared.
It can be updated but not redeclared within the same block.
const
const pi = 3.14;
Its value cannot be reassigned after initialization.
It must be initialized when declared.
const is also block-scoped like let.
var
var name = "John"; or var name; e.t.c
var is function-scoped, meaning it is accessible within the function where it is declared.
It can be redeclared and updated.
Data Types
Data Types
String - Use double (" ") or single (' ') quotes. Example: let str = "Inderjit 'Singh' "; or let str = 'Inder'; It can also store numbers or be empty: "23", "a", "".
Indexing in JavaScript starts from 0 it can also apply on strings also. e.g str[1] = n
We can also get string length using name.length
String Concatenation - using (+) sign. e.g - "inder" + "jit" = inderjit also like "inder" + 1(number) = inder1
Number - Represents positive, negative, integer, and floating-point numbers. Example: let num = 42; or let num = -3.5;. JavaScript has a maximum limit for numbers.
BigInt - Used for very large numbers beyond the Number type's limit. Example: let bigNum = 9007199254740991n;
Boolean - Represents true or false values. Example: let isCodingFun = true;
Undefined - A variable that has been declared but not assigned a value. Example: let x; // undefined
Null - Represents an empty or unknown value. Example: let data = null;
Symbol - Used to create unique identifiers. Example: let sym = Symbol('id');
Object - A complex data type used to store key-value pairs. Example: let person = { name: "Inder", age: 20 };
JavaScript automatically detects the data type when a variable is assigned a value.
We can change the type of variables in JavaScript. Example: let value = "Hello"; // String, then value = 25; // Now Number
Nan
NaN stands for "Not-a-Number." It is a special value that represents an undefined or unrepresentable number, especially when a mathematical operation cannot return a valid number.
e.g = let result = 0 / 0; - result will be NaN,
let number = Number("hello"); // number will be NaN
To check if a value is NaN, you cannot directly use the equality operator (===) because NaN is not equal to itself. Instead, you should use the Number.isNaN() method:
let value = NaN;
console.log(Number.isNaN(value)); // true
Operators
Javascript operators are used to perform different types of mathematical and logical computations.
Types of JavaScript Operators
| Operator Type | Description | Example |
|---|---|---|
| Arithmetic Operators | Used to perform mathematical calculations. | +, -, *, /, %, ++, --, ** |
| Assignment Operators | Used to assign values to variables. | =, +=, -=, *=, /=, %=, **= |
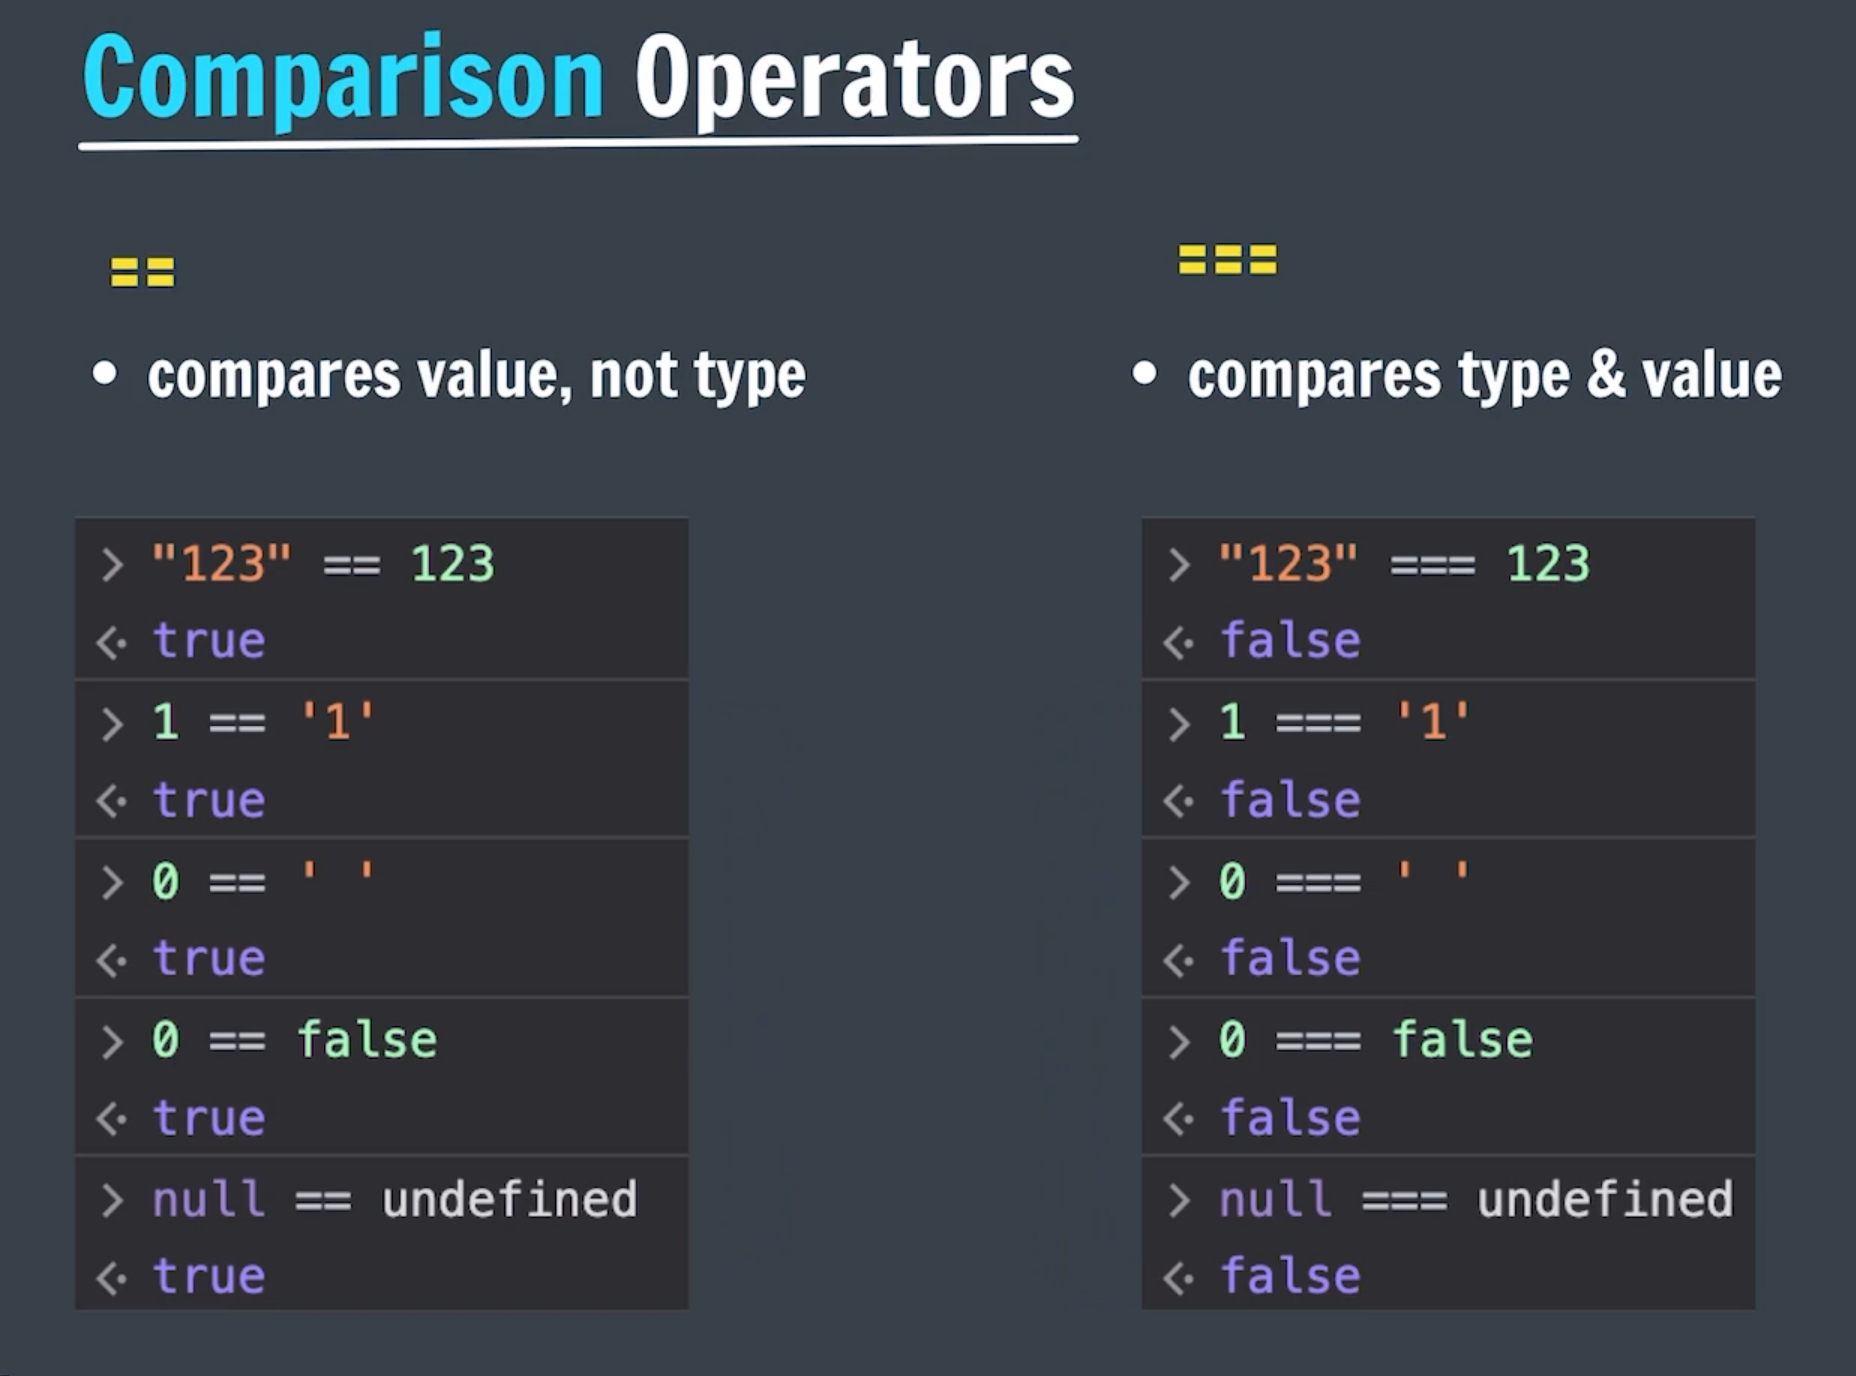
| Comparison Operators | Used to compare two values and return a boolean value. | ==, ===, !=, !==, >, <, >=, <= |
| Logical Operators | Used to perform logical operations between two or more expressions. | && (AND), || (OR), ! (NOT) |
| Unary Operators | Operates on a single operand. | +, -, ++, --, ! |
| Bitwise Operators | Used to perform bit-level operations. | &, |, ^, ~, <<, >>, >>> |
| Conditional (Ternary) Operator | Used to perform conditional evaluation. | condition ? expr1 : expr2 |
| Typeof Operator | Used to check the type of a variable or expression. | typeof x |
| Instanceof Operator | Used to check if an object is an instance of a specific class. | obj instanceof Class |
| Comma Operator | Used to evaluate multiple expressions and return the last result. | expr1, expr2 |
Comparing Strings
JavaScript compares strings character by character based on Unicode values.
e.g - onsole.log("apple" > "banana"); // false (because "a" < "b" in Unicode)
a(61) < b(62) < c(63) e.t.c OR A(41) < B(42) < C(43) e.t.c OR A < a e.t.c.
also console.log('*' < '&') // false e.t.c.
Operator Precendence
For some operators : () > ** > *, /, % > +, -
if two operators with same precedence then calculate from left to right
there are more operators with different precedence levels.
Identifiers
All JavaScript variables must be identified with unique names. These unique names are called identifiers.
rules:-
Names can contain letters, digits, underscores, and dollar signs.
Names must begin with a letter.
Names can also begin with $ and _ (but not start with numbers).
Names are case sensitive (y and Y are different variables).
Reserved words (like JavScript keywords) cannot be used as names.
camelCase
We use camelCase for identifier names (variables and functions) in JavaScript.
Camel Case: Use camel case for variable and function names. The first letter is lowercase, and each subsequent word starts with an uppercase letter.
e.g - firstName, totalPrice, lastWord e.t.c.
It's not mandatory, but following these practices can help improve coding standards.
JS Output
console.log()
console.log() is used to print output to the browser's console. It is mainly used for debugging.
e.g: console.log("Hello World");, console.log(num);, console.log(1+2);, console.log("Hello", num, (1+2)); e.t.c.
Template Strings
Template Strings (also known as Template Literals) are a feature that allow for easier and more readable string manipulation in JavaScript. In this we write inside backticks(``)
1. String Interpolation (Embedding Variables & Expressions)
Template literals allow you to embed variables and expressions directly within a string using ${}.
console.log(`Hello, my name is ${name} and I am ${age} years old.`);
Output: Hello, my name is Alice and I am 25 years old.
2. Multi-line Strings (Without \n or Concatenation)
Template literals preserve newlines and whitespace automatically.
e.g: const message = `This is a multi-line,
string in JavaScript.`;
console.log(message); - No need for + operators or \n!
3. Expression Evaluation (Math, Functions, etc.)
You can perform calculations and function calls inside ${}.
e.g : console.log(`The sum of ${x} and ${y} is ${x + y}.`);
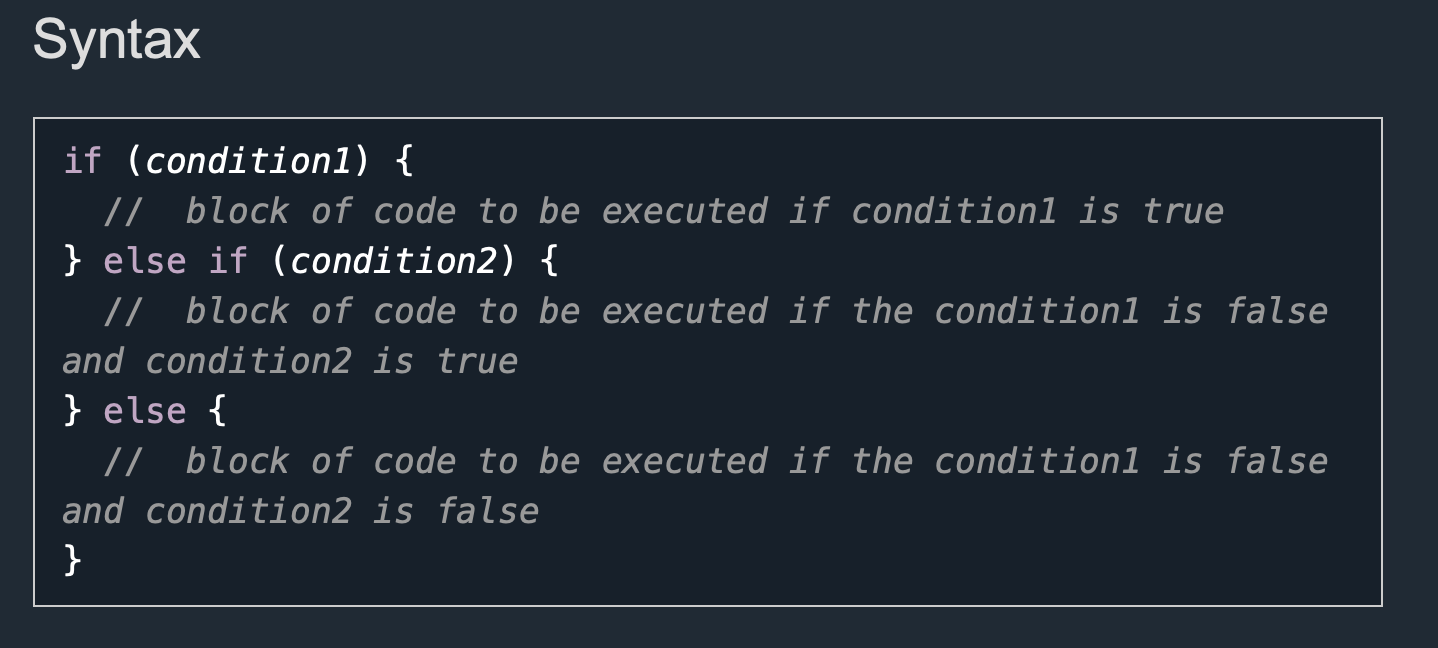
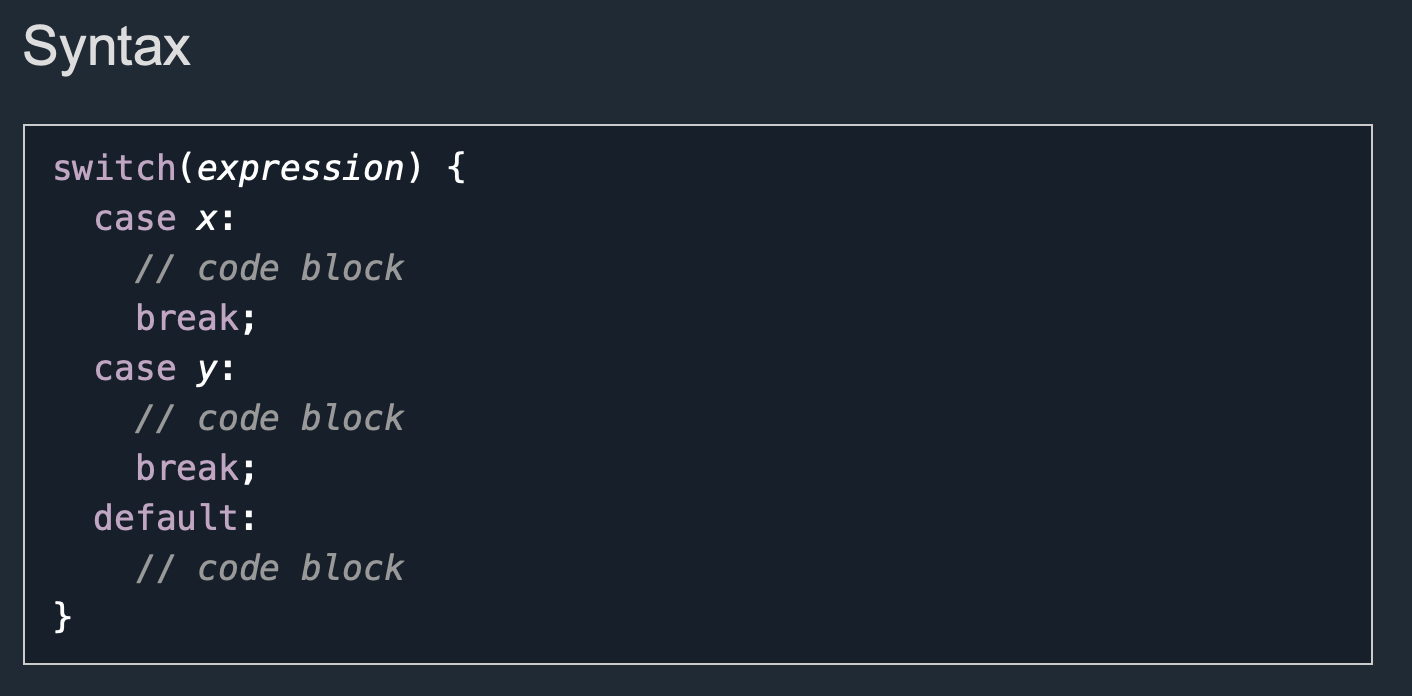
Conditional Statement
If, else, else if statements
Switch statements
Alerts & Prompts
alert()
The alert() function displays a simple message in a dialog box with an "OK" button.
e.g - alert("This is an alert!");
console.error()
Used to log error messages. It highlights the message in red and may include a stack trace.
console.error("This is an error message!");
console.warn()
Used to log warning messages. It displays messages in yellow.
console.warn("This is a warning message!");
prompt()
The prompt() function is used to get user input via a popup dialog box with a text field.
let userInput = prompt("Enter your name:");
Returns null if the user clicks "Cancel".
We can manupulate all these methods in many ways or use their combination we can also learn that.
String Methods
Javascript strings are primitive and immutable: All string methods produce a new string without altering the original string.
syntax - stringName.method()
Arguments - is some value that we pass to the method. but not every method accepts arguments.
syntax - stringName.method(arguments)
String length
The length property returns the length of a string.(it is a property not method but i included here)
syntax - stringName.length;
trim()
The trim() method removes whitespace from both sides of a string.
let text1 = " Hello ";
let text2 = text1.trim(); // text2 = "Hello"
toUpperCase() and toLowerCase()
A string is converted to upper case with toUpperCase().
A string is converted to lower case with toLowerCase().
e.g = str = "HELLO world"
str.toUpperCase() - HELLO WORLD, str.toLowerCase() - hello world
inderOf(arg)
The indexOf() method returns the index (position) of the first occurrence of a string in a string, or it returns -1 if the string is not found.
let text = "Please locate where 'locate' occurs!";
let index = text.indexOf("locate"); // output: 7
slice()
slice() extracts a part of a string and returns the extracted part in a new string.
The method takes 2 parameters: start position, and end position (end not included).
e.g - let text = "Apple, Banana, Kiwi";
one argument - text.slice(7, 13); - "Banana"
only one argument - text.slice(7) - "Banana, Kiwi" (in this last = length of string);
negative argument - text.slice(-5) - "Kiwi" (because length(here 19) - 5 = 14) == text.slice(14);
replace()
The replace() method replaces a specified value with another value in a string.
e.g - let str = "i love coding"
str.replace("love","do") - output: "i do coding";
It only replace first occurance by default.
e.g - str.replace("o","x") - output: "i lxve coding" (only changed first o).
repeat()
The repeat() method returns a string with a number of copies of a string.
e.g - let str = "Hello"
str.repeat(5) - output: "HelloHelloHelloHelloHello"
All methods
charAt(), charCodeAt(), concat(), includes(), indexOf(), lastIndexOf(), localeCompare(), match(), matchAll(), normalize(), padEnd(), padStart(), repeat(), replace(), replaceAll(), search(), slice(), split(), startWith(), endsWith(), substring(), substr(), toLowerCase(), toUpperCase(), toLocaleLowerCase(), toLocaleUpperCase(), trim(), trimStart(), trimEnd(), valueOf(), split(), anchor(), big(), blink(), bold(), fixed(), fontcolor(), fontsize(), italics(), link(), small(), strike(), sub(), sup().
we can learn more methods.
Method Chaining
Method chaining in JavaScript refers to the technique of calling multiple methods on the same object or value in a single line of code.
let str = " Hello World! "
let result = str.trim().toUpperCase().replace("WORLD", "EVERYONE");
console.log(result); // "HELLO EVERYONE!"
Method chaining works if the methods return the object or value that the next method expects.
Arrays
Arrays
An array is a special variable that can hold multiple values in a single reference.
Arrays in javascript are zero-indexed.
Arrays are mutable in javascript.
Arrays in JavaScript are dynamic (can change size) and can store different data types.
e.g = let arr = ["Apple", 23, 89.5]; - (array with different datatypes).
Creating an Array
Using Array Literal (Preferred Method):-
let fruits = ["Apple", "Banana", "Cherry"];
Using new Array() Constructor:-
let numbers = new Array(1, 2, 3, 4, 5);
Empty Array and Adding Elements:-
let arr = [];
arr[0] = "Hello";
arr[1] = "World";
Accessing Array Elements
1. console.log(fruits[1]); // Output: Banana
2. console.log(fruits[2][0]); // Output: C - (we can access index of elements of arrays like this).
3. array.length - Returns the number of elements in the array.(it is a property)
e.g fruits.length - 3
also length of elements - fruits[0].length - 5
also we can directly see length [1,2,3,4].length - 4
Modifying Arrays
As arrays are mutable.
let array = ["Apple", "Mango", "Cherry"];
array[0] = "Banana";
console.log(array) // Output: ["Banana", "Mango", "Cherry"] (array is changed).
we can add element in any index:-
array[10] = "Grapes";
console.log(array) // Output: ["Banana", "Mango", "Cherry", empty x 7, "Grapes"] (now the array.length = 11)
if we add element at index like greater then previous length then it is added to that index but there may empty spaces.
console.log(array[5]) //Output: undefined (as no element is present even array length is 11).
Array Methods
push()
The push() method adds a new element to an array (at the end).
let fruits = ["Banana", "Orange"];
fruits.push("Kiwi");
console.log(fruits); // Output: ["Banana", "Orange", "Kiwi"]
pop()
The pop() method removes the last element from an array and return it.
fruits.pop()
console.log(fruits); // Output: ["Banana", "Orange"]
unshift()
The unshift() method adds a new element to an array (at the beginning), and "unshifts" older elements.
fruits.unshift("Apple")
console.log(fruits); // Output: ["Apple", "Banana", "Orange"]
shift()
The shift() method removes the first array element and return it, "shifts" all other elements to a lower index.
fruits.unshift()
console.log(fruits); // Output: ["Banana", "Orange"]
indexOf()
the .indexOf() method is used to find the index of a specific element in an array.
syntax - array.indexOf(element, fromIndex).
element - The value to search for.
fromIndex (optional) - The index to start searching from (default is 0).
e.g - fruits.indexOf("Orange"). //output: 1
it returns - The first index where the element if found OR -1 if the element is not found.
includes()
the .includes() method is used to check if an array contains a specific element.
syntax - array.includes(element, fromIndex)
element - The value to search for.
fromIndex (optional) - The index to start searching from (default is 0).
e.g - fruits.includes("Orange"). //output: true
it returns - true or false.
concat()
the .concat() method is used to merge two or more arrays without modifying the original arrays.
syntax - newArray = array1.concat(array2, array3, ...);
we write which array first their element become first
e.g - let fruits2 = ["Apple", "Mango"];
let result = fruits.concat(fruits2);
console.log(result); // Output: ["Banana", "Orange", "Apple", "Mango"]
reverse()
the .reverse() method is used to reverse the order of elements in an array.
syntax - array.reverse();
It modifies the original array and returns the same array.
e.g - result.reverse(); // Output: ["Mango", "Apple", "Orange", "Banana"]
slice()
.slice() method is used to extract a portion of an array without modifying the original array.
syntax - array.slice(startIndex, endIndex);
startIndex (optional) - The index where extraction begins (inclusive).
endIndex (optional) - The index where extraction stops (exclusive).
If no parameters are given, it returns a copy of the entire array.
let num = [1,2,3,4];
e.g - result.slice(); // Output: [1, 2, 3, 4]
e.g - result.slice(2); // Output: [3, 4]
e.g - result.slice(1,3); // Output: [2, 3]
e.g - result.slice(-4,-2); // Output: [1, 2]
splice()
The .splice() method is used to add, remove, or replace elements in an array by modifying the original array.
syntax - array.splice(startIndex, deleteCount, item1, item2, ...);
startIndex - The position where changes begin.
deleteCount (optional) - The number of elements to remove.
item1, item2, ... (optional) - Elements to insert at startIndex.
e.g :-
let arr = [10, 20, 30, 40, 50];
let removed = arr.splice(2, 2);
console.log(arr); // Output: [10, 20, 50] (modified)
console.log(removed); // Output: [30, 40] (removed elements)
arr.splice(2, 0, 3, 4);
console.log(arr); // Output: [10, 20, 3, 4, 50] (deleted 0 added 3,4).
arr.splice(2);
console.log(arr); // Output: [10, 20] (Since deleteCount is not provided, all elements from index 2 onward are removed.)
sort()
The sort() method sorts an array alphabetically and modifies the original array.
syntax - array.sort OR array.sort(compareFunction);
compareFunction (optional) - A function that defines the sorting order.
By default, it sorts elements as strings in ascending order.
e.g :-
let fruits = ["Banana", "Apple", "Mango", "Orange"];
fruits.sort();
console.log(fruits); // Output: ["Apple", "Banana", "Mango", "Orange"]
let numbers = [100, 3, 20, 40];
numbers.sort();
console.log(numbers); // Output: [100, 20, 3, 40] ( Issue: Numbers are converted to strings and sorted based on the first digit (not numerical order)).
forEach()
The forEach() method in JavaScript is used to iterate over each element of an array. It executes a provided callback function once for each array element.
Syntax:-
                                array.forEach(function(element, index, array) {
                                      // Code to execute
                                });

                                element: The current element being processed.
                                index: (Optional) The index of the current element.
                                array: (Optional) The array on which forEach is called.
Examples:-
                                let arr = [1, 2, 3, 4, 5];

                                // 1.Using Arrow Function
                                arr.forEach((el) => {
                                      console.log(el); //print all elements
                                });


                                // 2.Using Regular Function
                                arr.forEach(function (el) {
                                      console.log(el); //print all elements
                                });


                                // 3.Using a Named Function
                                let print = function (el) {
                                      console.log(el); //print all elements
                                };
                                arr.forEach(print);

                                //Using index
                                arr.forEach((num, index) => {
                                    console.log(`Element at index ${index} is ${num}`);
                                });  // Output:  Element at index 0 is 1....print all like this

                                there are other ways possible also...
map()
The map method creates a new array by applying a callback function to each element of the original array. It transforms the elements and returns the result without modifying the original array.
Syntax:-
                                array.map((element, index, array) => {
                                      // Return transformed element
                                });

                                OR array.map(functionName); //many syntax possible

                                element: The current element being processed.
                                index: (Optional) The index of the current element.
                                array: (Optional) The array on which forEach is called.
Examples:-
                                //1.using arrow function
                                const numbers = [1, 2, 3, 4];
                                const doubled = numbers.map(num => num * 2);
                                console.log(doubled); // Output: [2, 4, 6, 8]


                                //2.using named function
                                const multiplyBy2 = function(num) {
                                      return num * 2;
                                };

                                const arr2 = [7, 8, 9];
                                const doubled = arr5.map(multiplyBy2);
                                console.log(doubled); // Output: [14, 16, 18]

                                there are other ways may possible also...
filter()
The filter method creates a new array containing only the elements that pass a test (return true) in the callback function. It’s used to select a subset of elements without altering the original array.
Syntax:-
                                array.filter((element, index, array) => {
                                      // Return transformed element
                                });

                                OR array.filter(functionName); //many syntax possible

                                element: The current element being processed.
                                index: (Optional) The index of the current element.
                                array: (Optional) The array on which forEach is called.
Examples:-
                                //1.using arrow function
                                const arr = [10, 15, 20, 25];
                                const greaterThan15 = arr2.filter(num => num > 15);
                                console.log(greaterThan15);  // Output: [20, 25]


                                //2.using named function
                                const isOdd = function(num) {
                                      return num % 2 !== 0;
                                };

                                const arr2 = [7, 8, 9];
                                const oddNumbers = arr5.filter(isOdd);
                                console.log(oddNumbers);    // Output: [7, 9]

                                there are other ways may possible also...
every()
The every method checks if all elements in an array satisfy a given condition. It returns true if every element passes. false if at least one element fails the test. It stops processing as soon as it encounters the first element that doesn't meet the condition(this is called short-circuiting).
Syntax:-
                                array.filter(function definition or Name); //there are other syntax also
Example:-
                                //using arrow function
                                const numbers = [1, 2, 3, 4, 5];
                                const allEven = numbers.every(num => num%2==0);
                                console.log(allEven);  // Output: false, because not every element is even

                                there are other ways may possible also...
some()
The some method checks if at least one element in an array satisfies a given condition. It returns: true if at least one element passes. false if no elements pass. It stops processing as soon as it finds the first element that meets the condition (short-circuiting).
Syntax:-
                                array.some(function definition or Name); //there are other syntax also
Example:-
                                //using arrow function
                                const numbers = [1, 2, 3, 4, 5];
                                const hasEven = numbers.some(num => num%2 == 0);
                                console.log(hasEven);
                                // Output: true, because atleast there one even element or more

                                there are other ways may possible also...
reduce()
The reduce() method is used to iterate through an array and accumulate a single value based on a callback function. It processes each element of the array (from left to right) and returns a single value result.
Syntax:-
                                array.reduce((accumulator, currentValue, index, array) => {
                                      // logic here
                                }, initialValue);
                                // index, array, initialValue are optional
                                //If no initial value is given, reduce starts from the first element. However, for cases like sum, it's better to set it to 0 to avoid errors.

                                array.reduce(function definition(accumulator, element) or Name); //there are other syntax also
Example:-
                                const numbers = [1, 2, 3, 4];
                                const sum = numbers.reduce((acc, num) => acc + num);
                                console.log(sum); // Output: 10

                                there are other ways possible also...
All array methods names
push(), pop(), unshift(), shift(), splice(), slice(), concat(), indexOf(), lastIndexOf(), includes(), find(), findIndex(), forEach(), map(), filter(), reduce(), some(), every(), sort(), reverse(), join(), split(), flat(), flatMap(), fill(), copyWithin(), toString(), toLocaleString(), Array.isArray().
We can also learn about them.
Array Reference
Array Reference
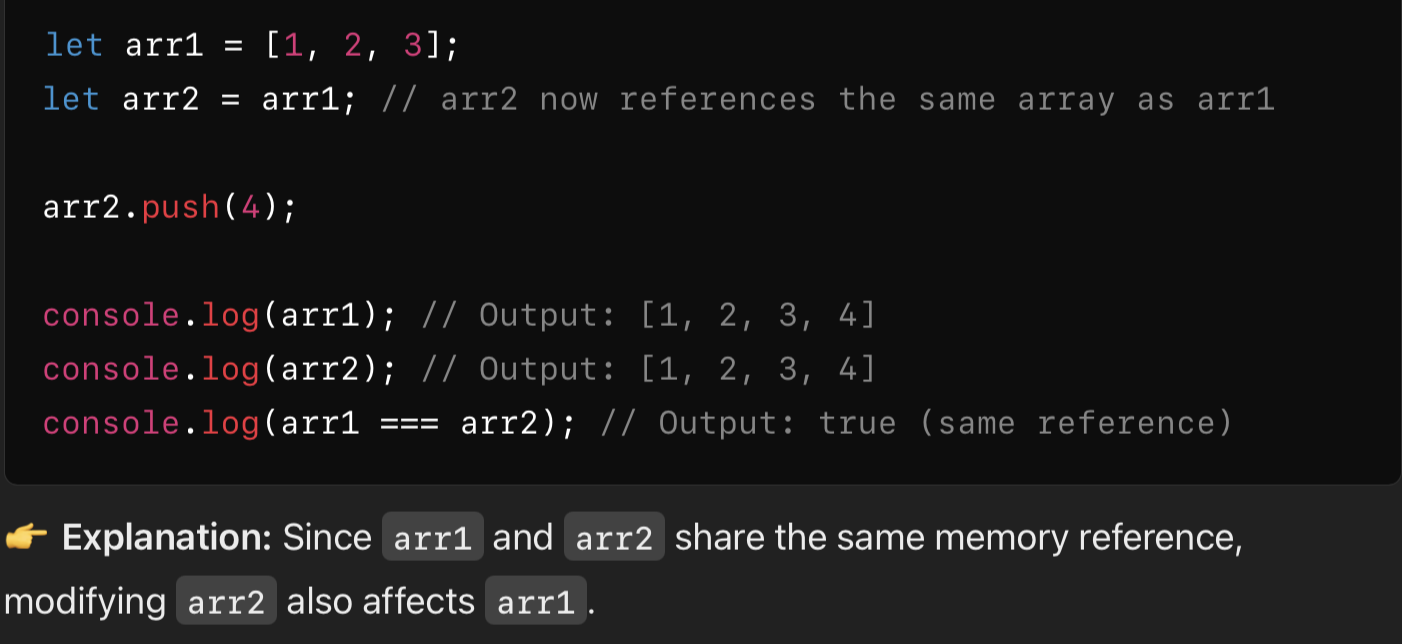
In JavaScript, arrays are reference types, meaning they are stored in memory as objects, and variables hold references (memory addresses) to these arrays rather than their actual values.
Assigning Arrays by Reference - When you assign an array to another variable, both variables point to the same array in memory.
e.g:-
Copying Arrays Without Reference - To create new independent copy of an array (instead of referencing the same memory), there are many methods for now Using .slice() or assign manually.
const Array
When you declare an array with const, the reference to the array remains fixed, meaning you cannot reassign it to a new array. However, the elements inside the array can still be modified.
declaretion - const arr = [1, 2, 3];
Modifying Elements (Allowed) - like push, pop, adding, removing elements.
Reassigning a Constant Array (Not Allowed) - like arr = [1,2]; on same array.
Multi-dimensional Arrays
Multi-dimensional Arrays
A nested array is an array inside another array. It is also called a multi-dimensional array.
let nestedArr = [[1, 2], [3, 4], [5, 6]];
                                    console.log(nestedArr); // Output: [[1, 2], [3, 4], [5, 6]]
                                    console.log(nestedArr[0]);    // Output: [1, 2] (First inner array)
                                    console.log(nestedArr[0][1]); // Output: 2 (Second element of first inner array)
Loops
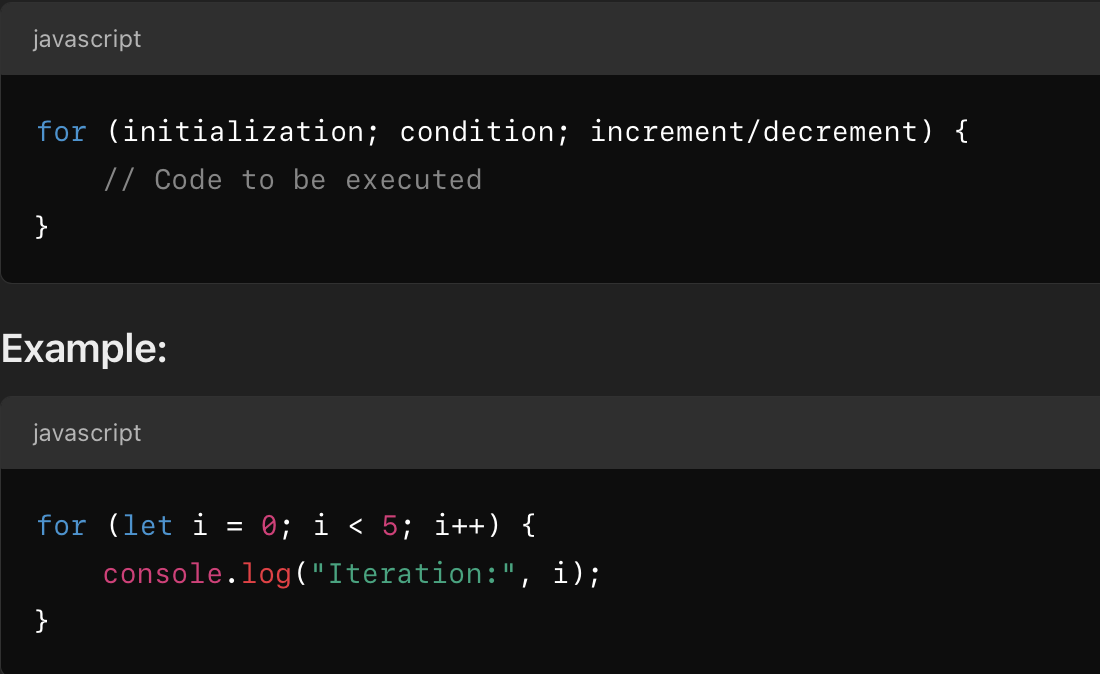
For loop
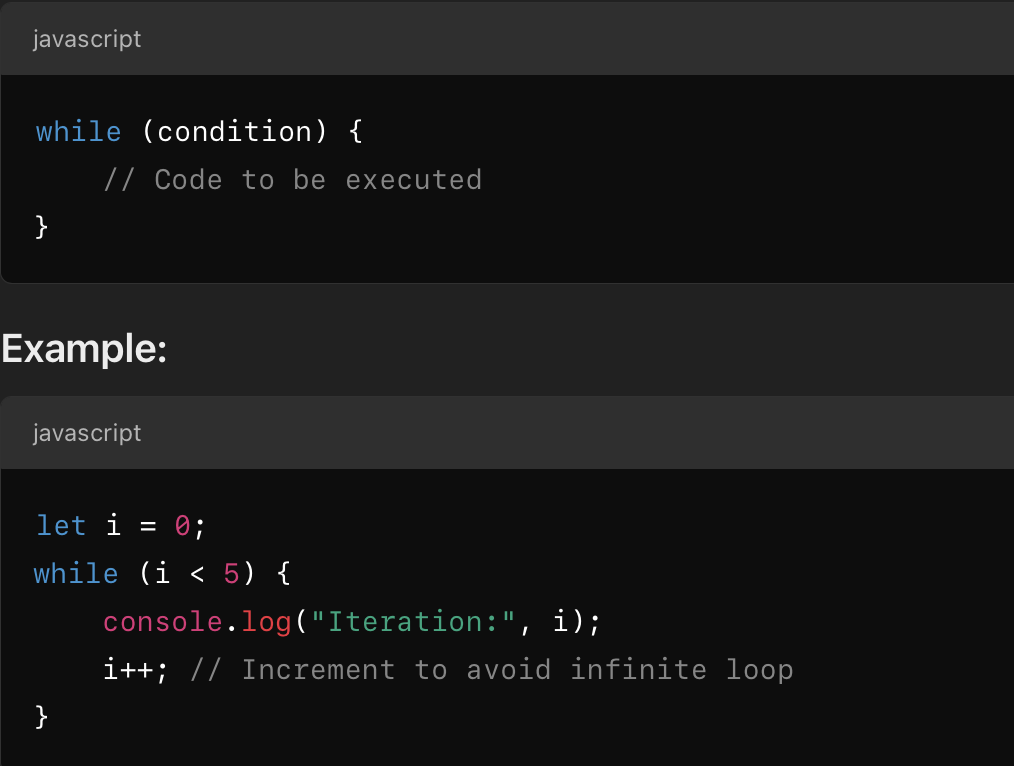
While loop
break keyword
The break statement in JavaScript is used to exit a loop immediately when a specific condition is met.
for (let i = 0; i < 5; i++) {
                                      if (i === 3) {
                                        break; // Exits the loop when i is 3
                                      }
                                      console.log("Iteration:", i);
                                }
for of loop
The for...of loop in JavaScript is used to iterate over iterable objects like arrays, strings, maps, and sets.
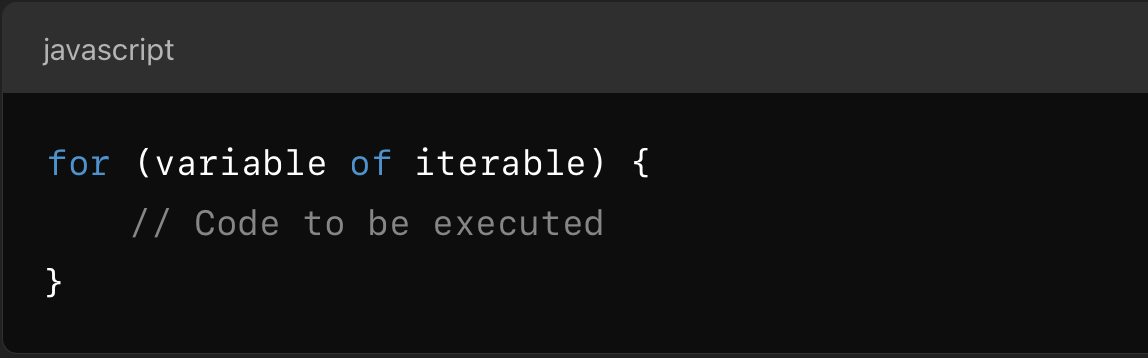
Examples:-
                                    let numbers = [10, 20, 30, 40];
                                    for (let num of numbers) {
                                      console.log(num);
                                    }

                                    let word = "Hello";
                                    for (let char of word) {
                                      console.log(char);
                                    }
Object Literals
Object Literals
An object literal is a way to define an object using a set of key-value pairs enclosed in curly braces {}.
Key-Value Pairs - Each property has a key (property name) and a value.
A single key can hold multiple values using arrays, objects, or other data structures.
objects are unordered collections do not maintain a fixed order,Objects do not have indexing like arrays.
Example:-
                                    const person = {
                                          firstName: "John",
                                          lastName: "Doe",
                                          scores: { math: 90, science: 85, english: 88 }  // Nested object
                                          fullName: function() {
                                                return this.firstName + " " + this.lastName;
                                          }
                                    };
                                    This creates an object with properties like firstName, lastName, scores and a method fullName.

                                    Here, fullName is a method. calling person.fullName() returns 'John Doe'
A const object behaves like a const array - you can modify its contents but cannot reassign it.
Accessing Object Properties
You can access object properties using object.key or object["key"].
const person = { firstName: "John", lastName: "Doe" };

                                // Using dot notation
                                console.log(person.firstName); // Output: "John"

                                // Using bracket notation
                                console.log(person["lastName"]); // Output: "Doe"

                                //for nested objects
                                console.log(person.scores.math); // Output: 90
                                OR like
                                console.log(person["scores"]["math"]); // Output: 90
JavaScript Automatically Converts Object Keys to Strings :-
const obj = {
                                      "null": "a",
                                      2:"b"
                                };

                                console.log(obj.null);  // Output: "a"
                                console.log(obj["2"]);  // Output: "b"
Add/Update values
const obj = {
                                      a: 1,
                                      b: 2
                                };

                                obj.c = 3;  // Adding new property using dot
                                obj["d"] = 4;  // Adding another property using square brackets

                                obj.a = [10,20];  // Updating existing property
                                obj["b"] = "two";  // Updating another property

                                console.log(obj);  // Output: { a: [10,20], b: "two", c: 3, d: 4 }
Delete values
We can use the delete operator to remove a property from an object.
const obj = {
                                      a: 1,
                                      b: 2,
                                      c: 3
                                };

                                delete obj.c;  // Deleting property 'c'
                                delete obj["b"];  // Deleting property 'b'

                                console.log(obj);  // Output: { a: 1 }
Nested Objects
const obj = {
                                      person1: { name: "John", age: 25 },
                                      person2: { name: "Alice", age: 30 }
                                };

                                console.log(obj.person1.name);
Array of Objects
const arr = [
                                      { name: "John", age: 25 },
                                      { name: "Alice", age: 30 }
                                ];

                                console.log(arr[0].name);
Object Functions(Methods)
Object methods are functions that are defined inside an object and can operate on the object's properties. They provide behavior to the objects.
const calculator = {
                                      // Key-value pair method
                                      sub: function(a, b) {
                                            return a - b;
                                      },

                                      // Shorthand method without key
                                      add(a, b) {
                                            return a + b;
                                      }
                                };

                                console.log(calculator.add(5, 3));  // Output: 8
                                console.log(calculator.sub(10, 4)); // Output: 6
Math Object
The Math object is a built-in JavaScript object that provides mathematical functions and constants.
Math Properties (Constants)
The syntax for any Math property is : Math.property.
| Property | Description | Value |
|---|---|---|
Math.PI |
Returns the value of Pi (π) | 3.141592653589793 |
Math.E |
Returns Euler’s number (e) | 2.718281828459045 |
Math.SQRT2 |
Returns the square root of 2 | 1.4142135623730951 |
Math.SQRT1_2 |
Returns the square root of 1/2 (1/√2) | 0.7071067811865476 |
Math.LN2 |
Returns the natural logarithm of 2 | 0.6931471805599453 |
Math.LN10 |
Returns the natural logarithm of 10 | 2.302585092994046 |
Math.LOG2E |
Returns the logarithm base 2 of e | 1.4426950408889634 |
Math.LOG10E |
Returns the logarithm base 10 of e | 0.4342944819032518 |
Math Methods
The syntax for Math any methods is : Math.method(number).
| Method | Description | Example |
|---|---|---|
Math.round(x) |
Rounds x to the nearest integer | Math.round(4.6) → 5 |
Math.floor(x) |
Rounds x down to the nearest integer | Math.floor(4.9) → 4 |
Math.ceil(x) |
Rounds x up to the nearest integer | Math.ceil(4.1) → 5 |
Math.trunc(x) |
Removes the decimal part of x | Math.trunc(4.9) → 4 |
Math.abs(x) |
Returns the absolute value of x | Math.abs(-5) → 5 |
Math.sqrt(x) |
Returns the square root of x | Math.sqrt(16) → 4 |
Math.pow(x, y) |
Returns x raised to the power of y | Math.pow(2, 3) → 8 |
Math.max(a, b, ...) |
Returns the largest number | Math.max(10, 20, 5) → 20 |
Math.min(a, b, ...) |
Returns the smallest number | Math.min(10, 20, 5) → 5 |
Math.random() |
Returns a random number between 0 and 1 | Math.random() → 0.54321 |
Math.log(x) |
Returns the natural logarithm of x | Math.log(10) → 2.302 |
Math.sin(x) |
Returns the sine of x (radians) | Math.sin(Math.PI / 2) → 1 |
Math.cos(x) |
Returns the cosine of x (radians) | Math.cos(0) → 1 |
Math.tan(x) |
Returns the tangent of x (radians) | Math.tan(Math.PI / 4) → 1 |
random integer - to print any random numbers between any range we can manupulate Math.random
e.g - to print between x to y - Math.floor(Math.random() * (y - x + 1)) + x; e.t.c
Functions
Functions
There are several ways to define a function in JavaScript.
Function Declaration:-
                                function name(parameter1, parameter2....) {
                                      // code to be executed
                                }
Assigned to a variable(Function Expression) :-
Function Expression:-
                                const add = function(a,b) {
                                      return a+b;
                                }

                                console.log(add(5, 3));
                                we can also change value of add later.
return - anything after return statement will not execute.
Default Parameters
Default parameters allow you to set default values for function arguments if no value or undefined is passed.
Function Declaration:-
                                function functionName(parameter = defaultValue) {//function body}
Examples:-
                                //1.with normal functions
                                function calculateArea(length, width = 3) {
                                      return length * width;
                                }
                                console.log(calculateArea(7));     // Output: 21 (7 * 3)

                                //2.with arrow functions
                                const multiply = (a = 2, b = 3) => a * b;
                                console.log(multiply(4));     // Output: 12 (4 * 3)


                                const multiply = (a = 3, b) => a * b;
                                console.log(multiply(4));
                                // Output: NaN, because 4 is assigned to a and b remains undefined

                                So, Use default parameters at last..
The default value is used if the argument is undefined but not if it is null or a falsy value like 0.
Higher-Order Functions
Higher-order functions in JavaScript are functions that can either take other functions as arguments, return a function as a result, or both.
1. Passing a Function as an Argument
                                let greet = function() {
                                      console.log("Hello");
                                }

                                function higherOrder(func,n) {
                                      for(i = 0;i < n; i++){
                                            func();
                                      }
                                }

                                higherOrder(greet,5); //Output: Hello (5 times)
2. Returning a Function
                                function oddEvenTest(request) {
                                      if (request === "odd") {
                                            return function(n) {
                                                  console.log(!(n % 2 === 0))
                                                };
                                      } else if(request === "even") {
                                            return function(n) { console.log(n % 2 === 0); };
                                      }
                                }

                                // Using the function
                                let checkOdd = oddEvenTest("odd");
                                checkOdd(5);  // Output: true

                                let checkEven = oddEvenTest("even");
                                checkEven(7); // Output: false
Arrow Functions
Arrow functions(=>) are a shorter syntax for writing function expressions. They were introduced in ES6 and are often used for shorter, simpler functions.
Syntax:-
                                const name = (param1, param2....) => {
                                      // Code block
                                };
if we have single parameter we can also skip () paranthesis:-
                                const func = param => {
                                      // Code block
                                };
Implicit Return:
                                const square = x => x * x;  // Implicit return
                                Implicit Return: If there's only one expression, you can skip the {} and return.

                                there may also possible more syntax.
No this Binding: Arrow functions do not have their own this. They inherit this from their lexical scope. If you need this to refer to the object, use a regular function instead.
Cannot be used as Constructors: They can't be used with the new keyword.
Scope
Scope determines the accessibility of variables, objects, and functions in different parts of your code. It controls where variables can be accessed or modified.
1. Global Scope
Variables declared outside of any function or block. Accessible from anywhere in the code.
2. Local Scope
Variables declared inside a function. Accessible only within that function.
function localScope() {
                                      let localVar = "I am local";
                                      console.log(localVar); // Accessible
                                }

                                localScope();
                                console.log(localVar); // Error: localVar is not defined
3. Block Scope (ES6)
Variables declared with let or const inside curly braces {}. Accessible only within that block.
{
                                      let blockLet = "I am block scoped";
                                      console.log(localVar); // Accessible
                                      var functionVar = "I am function scoped";
                                }

                                console.log(blockLet); // Error: localVar is not defined
                                console.log(functionVar); // Accessible because defined with var keywoard but we don't prefer that
4. Function Scope
Variables declared with var are function-scoped. Accessible only within the function, but not restricted by blocks.
function funcScope() {
                                      var funcVar = "I am function-scoped";
                                      if (true) {
                                            var insideIf = "Still in function scope";
                                      }

                                      console.log(funcVar);     // Accessible
                                      console.log(insideIf);    // Accessible
                                }

                                funcScope();
                                console.log(funcVar); //  Error: funcVar is not defined
5. Lexical Scope
Inner functions have access to variables of their parent functions. This concept forms the basis of closures.
function outer() {
                                  let outerVar = "I am from outer";

                                  function inner() {
                                        console.log(outerVar); // Accessible due to lexical scope
                                  }

                                  inner(); //Works fine
                            }

                            outer(); //Works fine
                            inner(); //Error: inner is not defined (Function scope)
| Scope Type | Keyword | Accessibility |
|---|---|---|
| Global | var, let, const | Anywhere in the code |
| Local | var, let, const | Within the function only |
| Block | let, const | Within the block {} |
| Function | var | Within the function, not block-based |
| Lexical | - | Access to parent function variables |
Scope Chain
If a variable is not found in the current scope, JavaScript looks up in the outer scope until the global scope.
let x = 10;

                                function first() {
                                      let x = 20;
                                      let y = 30;

                                      console.log(x, y); // 20, 30  (Local scope has priority over global scope)
                                }
                                first();
This Keyword
this keyword refers to the object that is executing the current piece of code - whether it's a function, method, constructor or in global scope(window).The value of this can vary depending on where and how it is used.
1. Global Context
In the global scope (outside of any function), this refers to the global object (window in browsers, global in Node.js).
console.log(this); // Logs the window object in browsers
2. Inside a Method (Object Context)
When used inside an object method, this refers to the object calling the method.
const person = {
                                      name: "Alex",
                                      greet() {
                                            console.log(this.name);  // "Alex"
                                            console.log(name); // Error: name is not defined
                                      }
                                };

                                person.greet();

                                When we use console.log(name) without this, JavaScript searches for name in the local and global scope. Since it's not found, it throws a ReferenceError.
3. Inside a Normal Function
In normal functions, the value of this depends on the calling object — the object that invokes the function. It is determined at runtime and is dynamic.
const person = {
                                      name: "Alex",
                                      showName: function() {
                                            console.log(this.name);  // 'this' refers to the person object
                                      },

                                      getInfo: function () {
                                            setTimeout(function () {
                                                  console.log(this);  // 'this' refers global object, not person object
                                            }, 2000);
                                      }
                                };

                                // A separate normal function to show how 'this' works globally
                                function showGlobalThis() {
                                      console.log(this);  //this will refer to the global object
                                }

                                person.showName();      // Output: "Alex"
                                showGlobalThis();       // Output: Window object (in browsers)
4. Inside a Arrow Functions
In arrow functions, this has lexical scoping. It inherits this from its parent scope (the scope where it was defined), and it cannot be changed by how or where it is called.
const student = {
                                      name: "Aman",
                                      marks: 95,
                                      prop: this,  // Global scope

                                      getMarks: () => { //arrow function
                                            console.log(this);  // 'this' refers global object, not student object
                                            return this.marks;  // undefined
                                      },

                                      getInfo1: function () { //arrow function
                                            setTimeout(() => {
                                                  console.log(this);  // 'this' refers to student object (lexical scope)
                                            }, 2000);
                                      },
                                };
This has many other uses here short summary:-
| Context | What "this" Refers To | Example | Output |
|---|---|---|---|
| Global Scope | Global object (window in browsers) | console.log(this); | window |
| Inside a Function (Non-Strict Mode) | Global object (window in browsers) | function test() { console.log(this); } test(); | window |
| Inside a Function (Strict Mode) | undefined | 'use strict'; function test() { console.log(this); } test(); | undefined |
| Inside an Object Method | The object calling the method | const obj = { name: "Alex", show() { console.log(this.name); } }; obj.show(); | "Alex" |
| Inside a Constructor | The new instance created | function Car(model) { this.model = model; } const myCar = new Car("Tesla"); console.log(myCar.model); | "Tesla" |
| Arrow Function | Lexically inherits "this" from parent scope | const obj = { name: "Sam", show: () => console.log(this); }; obj.show(); | Global object (window) |
| DOM Event Handler | The HTML element that received the event | <button onclick="console.log(this)">Click</button> | The button element |
| Class Method | The instance of the class | class Person { constructor(name) { this.name = name; } greet() { console.log(this.name); } } const p = new Person("Alex"); p.greet(); | "Alex" |
| setTimeout (Regular Function) | Global object (non-strict mode) | setTimeout(function() { console.log(this); }, 1000); | window |
| setTimeout (Arrow Function) | Inherits "this" from its surrounding scope | const obj = { name: "Alex", show() { setTimeout(() => console.log(this.name), 1000); } }; obj.show(); | "Alex" |
Try and Catch
try...catch is a JavaScript mechanism for handling errors gracefully. It helps you catch and manage exceptions that may occur during runtime, preventing the entire application from crashing.
try block
The try block contains code that might throw an error. JavaScript attempts to execute this code. If no error occurs, it runs normally, and the catch block is skipped. If an error does occur, execution stops in the try block, and control jumps to the catch block.
catch block
The catch statement allows you to define a block of code to be executed, if an error occurs in the try block.It receives an error object as an argument(optional).If we used try then catch must also be used with it otherwise error come also.
finally Block (Optional)
You can add a finally block after try and catch. This block runs no matter what—whether an error occurred or not. It's commonly used for cleanup tasks, such as closing resources.
example
Common Use Cases:
Handling network requests or API failures.
Preventing application crashes due to undefined variables or incorrect data types.
Providing meaningful error messages to users.
 syntax:-
                            try {
                                  // Code that may throw an error
                            } catch (error) {
                                  // Code to handle the error. error argument optional here
                            } finally {
                                  // Optional block that runs regardless of error
                            }
 example:-
                                try {
                                      console.log(undeclaredVariable);  // This will throw a ReferenceError
                                } catch (error) {
                                      console.log("An error occurred!"); // Simple error message
                                      console.log(error); //print the entire error object
                                      console.log("Error Name:", error.name); // ReferenceError
                                      console.log("Error Message:", error.message); // undeclaredVariable is not defined
                                } finally{
                                      console.log("Execution completed");
                                }


                                error.name: Type of the error (like ReferenceError, TypeError, etc.)
                                error.message: A description of the error.
                                error.stack: Information about where the error occurred.
                                at place of error argument we can use any name like err e.t.c
Windows Object
The window object is the global object in the browser environment. It represents the browser window or tab where JavaScript is running. It is automatically created by the browser.
e.g - If a document contain frames (<iframe> tags), the browser creates one window object for the HTML document, and one additional window object for each frame.
Features of Window Object
Global Scope: All global variables and functions are properties and methods of the window object.
var x = 10;
                                console.log(window.x);  // Output: 10
Implicit Reference: You can omit window while accessing its properties and methods.
window.alert("Hello!"); // Same as alert("Hello!");
Global variables declared with var become properties of the window object. However, variables declared with let or const do not.
properties and methods
Some Window Object properties and methods there are many more also
| Property/Method | Description | Example |
|---|---|---|
| window.alert() | Displays an alert box | window.alert("Hello!") |
| window.prompt() | Displays a dialog box for user input | let name = window.prompt("Name:") |
| window.confirm() | Shows a confirmation dialog box | window.confirm("Are you sure?") |
| window.location | Information about the current URL | console.log(window.location.href) |
| window.history | Accesses browser history | window.history.back() |
| window.navigator | Information about the browser | console.log(window.navigator.userAgent) |
| window.setTimeout() | Executes code after a delay | window.setTimeout(() => alert("Hi"), 2000) |
| window.setInterval() | Repeats code at set intervals | window.setInterval(() => console.log("Tick"), 1000) |
| window.open() | Opens a new browser window or tab | window.open("https://example.com") |
| window.close() | Closes the current window | window.close() |
| window.innerWidth | Width of the window's viewport | console.log(window.innerWidth) |
| window.innerHeight | Height of the window's viewport | console.log(window.innerHeight) |
setTimeout and setInterval
setTimeout
setTimeout() is a built-in JavaScript function that executes a piece of code or a function(callback) after a specified delay (in milliseconds).
Syntax:-
                                setTimeout(function, delay, arg1, arg2, ...);

                                function: The function to be executed after the delay.
                                delay: Time in milliseconds (1000 ms = 1 second).
                                arg1, arg2, ... (optional): Additional arguments to pass to the function.
Example 1: Using a Named Function
function greet() {
                                      console.log("Hello, World!");
                                }

                                setTimeout(greet, 2000);  // Runs after 2 seconds
Example 2: Using an Anonymous Function(without name)
setTimeout(() => {
                                      console.log("This runs after 3 seconds!");
                                }, 3000);
Example 3: Passing Arguments
function displayMessage(name, age) {
                                      console.log(`Hello ${name}, you are ${age} years old!`);
                                }

                                setTimeout(displayMessage, 1500, "Alex", 21);  // Runs after 1.5 seconds
Example 4: Clearing a Timeout
let timeoutId = setTimeout(() => {
                                      console.log("This won't run!");
                                }, 3000);

                                clearTimeout(timeoutId);  // Cancels the timeout // Runs after 1.5 seconds
setInterval
setInterval() is a built-in JavaScript function that repeatedly executes a function or code snippet at a specified time interval (in milliseconds) until it's stopped.
Syntax:-
                                setInterval(function, interval, arg1, arg2, ...);
                                arguments are optional
                                same syntax as setTimeout
Example 1: Using a Named Function (all Syntax same as setTimeout)
function showTime() {
                                      console.log(new Date().toLocaleTimeString());
                                }
                                setInterval(showTime, 1000);  // Displays time every 1 second
Example 2: Using an Anonymous Function (without name)
setInterval(() => {
                                      console.log("Repeating message every 2 seconds!");
                                }, 2000);
Example 3: Passing Arguments
function greet(name) {
                                      console.log(`Hello, ${name}!`);
                                }
                                setInterval(greet, 3000, "Alex");  // Runs every 3 seconds with argument "Alex"
Example 4: Clearing an Interval. If we not clear interval it will run infinitely
let count = 0;
                                const intervalId = setInterval(() => {
                                      count++;
                                      console.log(`Count: ${count}`);
                                      if (count === 5) {
                                            clearInterval(intervalId);
                                            console.log("Interval cleared!");
                                    }
                                }, 1000);


                                //using setTimeout
                                let id = setInterval(() => {
                                      console.log("Hello");
                                }, 2000); //print Hello 5 times after that setTimeout runs clearInterval

                                setTimeout(() => {
                                      clearInterval(id);
                                }, 10000);
Spread/Rest
spread(...) operator
The spread operator (...) allows you to expand or unpack elements from arrays, objects, or iterables. It helps create copies of arrays/objects, merge them, and pass multiple elements as function arguments.
1.Copying Arrays
                                const original = [1, 2, 3];
                                const copy = [...original];
                                console.log(copy); // [1, 2, 3]
2.Merging Arrays
                                const arr1 = [1, 2];
                                const arr2 = [3, 4];
                                const merged = [...arr1, ...arr2];
                                console.log(merged); // [1, 2, 3, 4]
3.Passing Arguments to Functions
                                When a function expects multiple arguments, you can use the spread operator to pass elements of an array as individual arguments.

                                const numbers = [5, 10, 2];
                                const max = Math.max(...numbers);
                                console.log(max); // 10
4.Expanding Strings or Other Iterables
                                const str = "hello";
                                const chars = [...str];
                                console.log(...str); // h e l l o
                                console.log(chars); // ['h', 'e', 'l', 'l', 'o']
5.With Object Literals
                                // 1. Copying and Extending an Object
                                const data = { email: "ironman@gmail.com", password: "abcd" };
                                const dataCopy = { ...data, id: 123, };
                                console.log(dataCopy);
                                // Output: { email: "ironman@gmail.com", password: "abcd", id: 123}


                                // 2. Spreading an Array(also srting) into an Object
                                let arr = [1, 2, 3, 4, 5];
                                let obj1 = { ...arr }; //using {}
                                console.log(obj1);
                                // Output: { 0: 1, 1: 2, 2: 3, 3: 4, 4: 5 }


                                many other uses of spread also...
The spread operator only creates a shallow copy. Changes to nested objects affect the original. If an array contains objects, those objects are still referenced, not cloned.
rest(...) parameter
The rest parameter (...) is used in function definitions to gather multiple arguments into an array. It helps handle a variable number of arguments easily.
Syntax:-
                                function funcName(...restParameter) {
                                      // Code using restParameter as an array
                                }
1.Rest in Functions
                                function sum(...numbers) {
                                      return numbers.reduce((acc, curr) => acc + curr);
                                }

                                console.log(sum(1, 2));        // Output: 3
                                console.log(sum(4, 5, 6, 7));    // Output: 22
2.With other parameters
                                function multiply(multi, ...numbers) {
                                      return numbers.map(num => num * multi); //multi = 2
                                }
                                console.log(multiply(2, 1, 2, 3));  // Output: [2, 4, 6]
                                //always use other parameters in starting


                                many other ways to use...
Spread VS Rest: Rest collects multiple elements into an array. Spread expands elements from an array or object.
Destructuring
Destructuring in JavaScript is a feature that allows you to extract values from arrays or properties from objects and assign them to distinct variables in a readable way. It simplifies extracting data from complex structures.
1. Array Destructuring
examples:-
                                const fruits = ["apple", "banana", "cherry"];

                                // Unpacking values into variables
                                const [first, second, third] = fruits;
                                console.log(first,second,third);  // Output: "apple", "banana", "cherry"


                                //Skipping Values:
                                const [first, , third] = fruits;
                                console.log(first, third); // Output: "apple", "cherry"


                                //Using Rest with array
                                const [first, ...others] = fruits;
                                console.log(first);      // Output: "apple"
                                console.log(others);     // Output: ["banana", "cherry"]
2. Object Destructuring
examples:-
                                const person = { name: "Alex", age: 25, country: "USA" };

                                // Unpacking properties into variables
                                const { name, age, country } = person;
                                console.log(name, age, country);  // Output: Alex 25 USA
                                //we need to use same key names if we are not using renaming


                                //Renaming Variables:
                                const { name: fullName, age: years, country } = person;
                                console.log(fullName); // Output: "Alex"
                                console.log(years, country);    // Output: 25 USA


                                //Default Values:
                                const { gender = "Not specified", city: place = "Not known" } = person;
                                console.log(gender); // Output: "Not specified"
                                console.log(city); // Output: "Not known" //used renaming with default values


                                //Using Rest with Object:
                                const { name, ...details } = person;
                                console.log(name);     // Output: "Alex"
                                console.log(details);  // Output: { age: 25, country: "USA" }
3. Nested Destructuring
examples:-
                                const student = {
                                      name: "Emma",
                                      marks: { math: 90, science: 85 }
                                };

                                const {
                                      marks: { math, science }
                                } = student;

                                console.log(math);     // Output: 90
                                console.log(science);  // Output: 85
DOM
Document Object Model(DOM)
The DOM is essentially a representation of a webpage that a browser creates when it loads an HTML document. The DOM is a tree-like structure that represents the elements of a webpage as nodes. Each element (such as paragraphs, images, and headings) becomes an object that scripts can access and modify.
Document Object - The document object is the entry point to the DOM, representing the whole webpage in the browser. It allows JavaScript to dynamically access, modify, and update page content and structure. We can print it using console.dir(document);
Finding Elements
Often, with JavaScript, you want to manipulate HTML elements. To do so, you have to find the elements first. There are several ways to do this:
getElementById
Finds a single element by its id attribute.
Returns: The element object if found, or null if no match.
Syntax:-
                                document.getElementById("idName")
Example:-
                                <p id="intro">Hello there!</p>

                                let element = document.getElementById("intro");
                                console.log(element.textContent); // Outputs: "Hello there!"

                                //When to use: When you know the exact id of an element.
getElementsByClassName
Finds all elements with a specific class name from the DOM.
Returns: It returns a live HTMLCollection (a dynamic list) of all elements that match the given class name. If no elements match, it returns an empty collection.
Syntax:-
                                document.getElementsByClassName("className")
Example:-
                                <div class="box">One</div>
                                <div class="box">Two</div>

                                let boxes = document.getElementsByClassName("box");
                                console.log(boxes[0].textContent); // Outputs: "One"
                                console.log(boxes.length); // Outputs: 2

                                //When to use: When you need all elements sharing a class. Note: it’s live, so if the DOM changes, the collection updates.
getElementsByTagName
Finds all elements with a specified tag name from the DOM.
Returns: It returns a live HTMLCollection of all elements matching the given tag name. If no elements match, it returns an empty collection.
Syntax:-
                                document.getElementsByTagName("tagName")
Example:-
                                <p>First</p>
                                <p>Second</p>

                                let paragraphs = document.getElementsByTagName("p");
                                console.log(paragraphs[1].textContent); // Outputs: "Second"
Live Collection: The collection updates automatically if elements are added or removed.
Array-Like: It can be accessed using indices ([0], [1]), but it's not a real array.
querySelector
Finds the first matching element from the DOM based on a CSS selector. It is widely used and powerful, allowing you to use any valid CSS selector to target elements.
Returns: The first matching element, or null if no match.
Syntax:-
                                document.querySelector("selector")

                                Notes: You can use any CSS selector—like #id, .class, tag, or even [attribute="value"] e.t.c
Example:-
                                <div id="main">Main Div</div>
                                <p class="text">Paragraph 1</p>
                                <p class="text">Paragraph 2</p>

                                const mainDiv = document.querySelector('#main'); // Select by ID
                                const firstParagraph = document.querySelector('.text'); // Select first element with class 'text'

                                console.log(mainDiv.textContent);        // Output: "Main Div"
                                console.log(firstParagraph.textContent); // Output: "Paragraph 1"
querySelectorAll
Finds all matching elements from the DOM based on a CSS selector.
Returns: A NodeList (a static list-like object) of matching elements. If no matching elements are found, it returns an empty NodeList.
Syntax:-
                                document.querySelectorAll("selector")

                                Notes: You can use any CSS selector.
Example:-
                                <ul>
                                      <li class="item">Item 1</li>
                                      <li class="item">Item 2</li>
                                      <li class="item">Item 3</li>
                                </ul>

                                const items = document.querySelectorAll('.item');
                                console.log(items.length); // Output: 3

                                // Loop through all selected elements
                                items.forEach(item => {
                                      console.log(item.textContent);     // Output: "Item 1", "Item 2", "Item 3"
                                });
Returns a Static NodeList: This method returns a static list. It does not update automatically if the DOM changes.
Array-Like: The returned NodeList is array-like and can be iterated using forEach(), but it does not have all array methods like map() or filter().
Content Manipulation
innerText, textContent, and innerHTML e.t.c are properties used to get or set the content of HTML elements. They have different behaviors and use cases.
1. innerText
Gets or sets the visible text content of an element, ignoring hidden elements, script/style tags, and HTML markup.
Behavior: It reflects what a user actually sees on the page, taking CSS visibility into account (e.g., it skips text with display: none).
Example:-
                                <div id="example">
                                      Hello <span style="display:none">hidden</span> World!
                                </div>

                                let div = document.getElementById("example");
                                console.log(div.innerText); // Outputs: "Hello World!"

                                div.innerText = "New <b>text</b>";
                                // Replaces content with "New <b>text</b>"
                                // As we have used <b> tag but it not works because innerText works with plain text and ignores HTML tags.
2. textContent
Gets or sets the raw text content of an element, including all text within it (even hidden elements and script/style tags), but without interpreting HTML.
Behavior: It grabs everything as plain text, ignoring visibility or rendering rules.
Example:-
                                <div id="example">
                                      Hello <span style="display:none">hidden</span> World!
                                      <script>var x = 1;</script>
                                </div>

                                let div = document.getElementById("example");
                                console.log(div.textContent);
                                // Outputs: "Hello hidden World!\n     var x = 1;"

                                div.textContent = "New <b>text</b>";
                                // Replaces all content with "New <b>text</b>"
                                //Here also <b> tag is treated as text, not HTML.
3. innerHTML
Gets or sets the HTML content of an element, including tags, as a string. When setting it, the browser parses the string as HTML.
Behavior: It deals with markup, not just text, so you can add or manipulate elements and their structure.
Example:-
                                <div id="example">
                                    Hello <b>World!</b>
                                </div>

                                let div = document.getElementById("example");
                                console.log(div.innerHTML); // Outputs: "Hello <b>World!</b>"

                                div.innerHTML = "New text";
                                // Replaces content with "New text" , recognise html also

                                //other way to add style to same present text
                                div.innerHTML = `<u>${div.innerText}</u>`; //underline same text
When to use: When you need to work with HTML structure (e.g., adding tags, elements, or styling).
Note: Be cautious when setting innerHTML with user input—it can lead to security issues like XSS (cross-site scripting) if not sanitized.
Attribute Manipulation
The DOM provides several methods to get, set, check, or remove attributes.
1. getAttribute()
Retrieves the value of a specified attribute from an element.
Returns: The attribute's value as a string, or null if it doesn't exist.
Syntax:-
                                element.getAttribute("attributeName")
Example:-
                                <img id="pic" src="image.jpg" alt="A picture">

                                let img = document.getElementById("pic");
                                console.log(img.getAttribute("src")); // Outputs: "image.jpg"
                                console.log(img.getAttribute("title")); // Outputs: null (not set)
2. setAttribute()
Sets or updates the value of an attribute on an element.
Behavior: If the attribute exists, it updates it; if not, it creates it.
Syntax:-
                                element.setAttribute("attributeName", "value")
Example:-
                                <div id="box">Content</div>;

                                let div = document.getElementById("box");
                                div.setAttribute("class", "highlight");
                                div.setAttribute("id", "123");
                                console.log(div.outerHTML);
                                // Outputs: <div id="123" class="highlight">Content</div>

                                When to use: To add or modify any attribute,
3. hasAttribute()
Checks if an element has a specific attribute.
Behavior: true if the attribute exists, false if not (even if it's empty).
Syntax:-
                                element.hasAttribute("attributeName")
Example:-
                                <button id="btn" disabled>Click me</button>

                                let btn = document.getElementById("btn");
                                console.log(btn.hasAttribute("disabled")); // Outputs: true
4. removeAttribute()
Removes a specified attribute from an element.
Syntax:-
                                element.removeAttribute("attributeName")
Example:-
                                <p id="text" style="color: blue">Hello</p>

                                let p = document.getElementById("text");
                                p.removeAttribute("style");
                                console.log(p.outerHTML); // Outputs: <p id="text">Hello</p>
5. Using Properties Directly
For standard attributes (like id, className, src, value), you can access or modify them as properties of the element object.
Behavior: These are often more convenient than getAttribute/setAttribute, but they only work for well-known attributes.
Example:-
                                <input id="field" type="text" value="Initial">

                                let input = document.getElementById("field");
                                console.log(input.value); // Outputs: "Initial"

                                input.value = "Updated"; // Changes the value
                                console.log(input.type); // Outputs: "text"

                                //Special Case - className:
                                input.className = "form-field"; // Sets class attribute
                                console.log(input.className); // Outputs: "form-field"


                                When to use: For common attributes where direct property access is simpler and faster.
6. Working with data-* Attributes
Custom attributes prefixed with data- can be accessed via the dataset property.
Syntax:-
                                element.dataset.key (where key is the part after data-).
Example:-
                                <div data-type="product">Item</div>

                                let div = getElementsByTagName("div");
                                console.log(div.dataset.type); // Outputs: "product"
                                div.dataset.status = "active"; // Adds data-status="active"

                                console.log(div.outerHTML);
                                // Outputs: <div data-type="product" data-status="active">Item</div>
Style Manipulation
Style property
The style property in JavaScript allows you to directly manipulate the inline CSS styles of an HTML element. You access the style property through the DOM (Document Object Model) by selecting an element.
Syntax:-
                                element.style.propertyName;  //just accessing
                                element.style.property = "value"; //assigning value

                                You can set styles using camelCase for properties that have hyphens (-) in CSS.
                                like background-color changes to backgroundColor
Examples:-
                                <div id="box">Hello, World!</div>

                                //1. Setting styles
                                let box = document.getElementById("box");
                                box.style.backgroundColor = "yellow";  // Background color
                                box.style.border = "2px solid black";  // Border


                                //2. Getting Styles
                                console.log(box.style.fontSize);  // Output: "20px"
                                Note: It won't read styles from external CSS files or stylesheets.


                                //3. Removing Styles
                                To remove an inline style, set it to an empty string.
                                box.style.color = "";  // Removes the inline color style


                                //4. Multiple Styles Using Object.assign
                                Object.assign(box.style, {
                                      padding: "10px",
                                      margin: "15px",
                                      borderRadius: "5px"
                                });
Limitations: It only affects inline styles, not styles from external CSS files or <style> tags unless overridden.
classList property
The classList property is a read-only property that returns a live collection (DOMTokenList) of the class names assigned to an HTML element. It provides methods to easily add, remove, toggle, and check class names.
| 1 | add(className) — Adds a new class |
| 2 | remove(className) — Removes an existing class |
| 3 | toggle(className) — Adds the class if not present; removes it if present |
| 4 | contains(className) — Checks if the class exists (returns true or false) |
| 5 | replace(oldClass, newClass) — Replaces an existing class with a new one |
Syntax:-
                                element.classList;

                                //with its methods like add,remove,toggle, contains
                                element.classList.methodName("className")

                                // for replace
                                Replace: element.classList.replace("oldClass", "newClass")
Examples:-
                                <div id="box" class="container active">Hello, World!</div>

                                let box = document.getElementById("box");

                                //1. Accessing class list
                                console.log(box.classList);  // Output: DOMTokenList ["container", "active"]

                                //2. Adding a class
                                box.classList.add("highlight");

                                //3. Removing a class
                                box.classList.remove("active");

                                //4. Toggling a class
                                box.classList.toggle("hidden"); // Adds "hidden" if not present, otherwise removes it

                                //5. Checking if a class exists
                                console.log(box.classList.contains("container"));  // Output: true

                                //6. Replacing a class
                                box.classList.replace("container", "new-container");
The classList property is useful for dynamically applying or modifying styles defined in external stylesheets or CSS files.
DOM Navigation
DOM Navigation
DOM navigation refers to moving between elements in the HTML structure (like a family tree) using properties of DOM nodes.
This is useful for manipulating elements, including styles or classes, without relying solely on selectors like querySelector.
| parentElement | Access the parent of an element. | Returns an Element object or null if there's no parent element |
| children | Returns a live HTMLCollection of all child elements of an element | Type: HTMLCollection (array-like but not a true array; iterable using loops like for...of). |
| nextElementSibling | Returns the next sibling that is an element | Returns an Element object or null if there's no next element sibling. |
| previousElementSibling | Returns the previous sibling that is an element | Returns an Element object or nullif there's no previous element sibling. |
| Many other may also there... | ||
Syntax:-
                                element.property;

                                e.g - element.parentElement;
Examples:-
                                <div id="container">
                                      <p>First</p>
                                      Text between
                                      <p id="target">Second</p>
                                      <p>Third</p>
                                </div>


                                const target = document.getElementById("target");

                                // parentElement
                                console.log(target.parentElement); //Output: <div id="container">

                                // children (of the parent)
                                console.log(target.parentElement.children);
                                //Output: [<p>First</p>, <p>Second</p>, <p>Third</p>]

                                // nextElementSibling
                                console.log(target.nextElementSibling); //Output: <p>Third</p>

                                // previousElementSibling
                                console.log(target.previousElementSibling); //Output: <p>First</p>

                                //there are more also...
Create Elements
document.createElement()
To create elements using JavaScript, you can use the document.createElement() method.
Syntax:-
                                document.createElement("tagName")
                                //returns a new html element
Example:-
                                //1. Create a new element
                                const div = document.createElement('div'); //creates a new div element

                                //2. Add content (Content Manipulation)
                                div.textContent = 'Hello World'; //using textContent,innerHTML...

                                //3. Add attributes (Attribute Manipulation)
                                div.id = 'myDiv';
                                div.className = 'container';

                                //4. Add it to the document (using append)
                                document.body.appendChild(div);


                                Steps ~ Create - Add content - Add attributes - Append to show on page.
Append/Add Elements
Appending elements means adding new HTML elements (like <div>, <p>, etc.) to an existing part of the webpage (DOM). JavaScript offers several methods to append elements in various ways:
1. append()
Appends multiple elements or strings as the last children of the parent. More flexible than appendChild() because it accepts multiple arguments and can also used to add strings.
Syntax:-
                                parent.append(child or "string")

                                // to append multiple
                                parent.append(...children or "string")
                                parent.append(child1, child2 or "string1", "string2")

                                //...children - One or more elements, or strings (using spread operator)
Example:-
                                <div id="container">Previous content</div>

                                //1. Append string content at the end
                                const container = document.getElementById("container");
                                container.append(" Text using append", " and more text");
                                console.log(container.textContent); //Output: "Previous content Text using append and more text"

                                //2. to add element as last children
                                const span = document.createElement("span"); //creates span
                                span.textContent = " - Appended Span"; //adds content
                                container.append(span); //appends span
2. appendChild()
Adds a single element as the last child of the parent element. Only works with a single element (not multiple elements or strings).
Syntax:-
                                parent.appendChild(child)
Example:-
                                const parent = document.createElement('div'); //creates a div element
                                const child = document.createElement('p'); //creates a p element

                                child.textContent = 'I am the child'; //add content to p

                                parent.appendChild(child); // Adds <p> as last child of div

                                // Append the entire div (with its child) to the body of the document
                                document.body.appendChild(parent);


                                //Resulting structure:-
                                <body>
                                      other elements if present....
                                      <div>
                                            other elements if present....
                                            <p>I am the child</p>
                                      </div>
                                </body>
3. prepend()
Adds multiple elements or strings as the first children of the parent. Similar to append(), but inserts at the beginning.
Syntax:-
                                parent.prepend(child or "string")

                                // to append multiple
                                parent.prepend(...children or "string")
                                parent.prepend(child1, child2, "string1", "string2" e.t.c)

                                //...children - One or more elements, or strings (using spread operator)
Example:-
                                <div id="container">Existing Content</div>

                                const container = document.getElementById("container");

                                // Create an <h2> element
                                const heading = document.createElement("h2");
                                heading.textContent = "Prepended Heading";

                                // Create a <p> element with string content
                                const paragraph = document.createElement("p");
                                paragraph.textContent = "Additional Info - ";

                                //1. prepend() to add a string to the p element in front
                                paragraph.prepend("More Details Here - ");

                                //2. Prepend both elements to the container
                                container.prepend(heading, paragraph);


                                //Resulting structure:-
                                <div id="container">
                                      <h2>Prepended Heading</h2>
                                      <p>More Details Here - Additional Info</p>
                                      Existing Content
                                </div>
4. insertAdjacentElement()
Inserts a single element at a specific position relative to the target element. Not able to add string directly like append().
Syntax:-
                                element.insertAdjacentElement("position", newElement)
| 'beforebegin' | insert before the element itself |
| 'afterbegin' | insert inside the element, before its first child |
| 'beforeend' | insert inside the element but, after its last child |
| 'afterend' | insert after the element itself |
Example:-
                                <div id="container">Original Content</div>

                                // 1. "beforebegin" — Before the target element itself
                                const para1 = document.createElement("p");
                                para1.textContent = "Inserted Paragraph - beforebegin";
                                box.insertAdjacentElement("beforebegin", para1);

                                // 2. "afterbegin" — As the first child of the target element
                                const para2 = document.createElement("p");
                                para2.textContent = "Inserted Paragraph - afterbegin";
                                box.insertAdjacentElement("afterbegin", para2);

                                // 3. "beforeend" — As the last child of the target element
                                const para3 = document.createElement("p");
                                para3.textContent = "Inserted Paragraph - beforeend";
                                box.insertAdjacentElement("beforeend", para3);

                                // 4. "afterend" — After the target element itself
                                const para4 = document.createElement("p");
                                para4.textContent = "Inserted Paragraph - afterend";
                                box.insertAdjacentElement("afterend", para4);


                                //Resulting structure:-
                                <p>Inserted Paragraph - beforebegin</p>
                                      <div id="box">
                                            <p>Inserted Paragraph - afterbegin</p> //afterbegin
                                            Original Content
                                            <p>Inserted Paragraph - beforeend</p>
                                      </div>
                                <p>Inserted Paragraph - afterend</p>
there may other methods to append elements or strings....
Removing Elements
Removing elements in JavaScript refers to the process of deleting an HTML element or its content from the Document Object Model (DOM). This can be achieved using various methods like remove(), removeChild(), and innerHTML = "" e.t.c, depending on the specific requirement.
1. removeChild()
Removes a specified child element from its parent. You need a reference to both the parent and the child element.
Syntax:-
                                parent.removeChild(childElement)
                                child - The element to remove (must be a direct child of the parent)
Syntax:-
                                const parent = document.getElementById("list"); //selecting parent
                                const child = document.getElementById("listItem"); //selecting child

                                parent.removeChild(child); // Removes the selected child from the parent
2. remove()
Removes the element directly from the DOM without needing a reference to its parent. Simpler than removeChild().
Syntax:-
                                element.remove()
Syntax:-
                                const element = document.getElementById("item");
                                element.remove(); // Removes the element directly

                                e.g const body = document.getElementsByTagName("body");
                                body.remove(); // removes body element
                                //use it carefully
3. innerHTML = ""
Clears all content inside an element by setting its innerHTML to an empty string. Usage: When you want to remove all child elements and text inside a container.
Syntax:-
                                element.innerHTML = ""; //just set it to empty string
Syntax:-
                                const container = document.getElementById("content");
                                container.innerHTML = ""; // Clears all content inside with elements
also There are many other ways to remove elements...
DOM Events
DOM events are actions that happen in a web page, either due to user interaction or browser behavior, such as clicks, key presses, form submissions, etc. These events can be captured and handled using JavaScript.
Types of Events in JavaScript
A variety of events occur in JavaScript, categorized into different types:
| Event Type | Event Name | Description |
|---|---|---|
| Mouse Events | click |
Triggered when the user clicks an element. |
dblclick |
Triggered when the user double-clicks an element. | |
mousedown |
Triggered when a mouse button is pressed down. | |
mouseup |
Triggered when a mouse button is released. | |
mousemove |
Triggered when the mouse moves over an element. | |
mouseenter |
Triggered when the mouse enters an element. | |
| Keyboard Events | keydown |
Triggered when a key is pressed down. |
keyup |
Triggered when a key is released. | |
keypress |
Triggered when a key is pressed and released. | |
| Form Events | submit |
Triggered when a form is submitted. |
change |
Triggered when an input field's value is changed. | |
input |
Triggered whenever the value of an input field changes. | |
focus |
Triggered when an input field gains focus. | |
blur |
Triggered when an input field loses focus. | |
| Window Events | load |
Triggered when the page has fully loaded. |
resize |
Triggered when the browser window is resized. | |
scroll |
Triggered when the user scrolls the page. | |
unload |
Triggered when the page is about to be unloaded. | |
| Clipboard Events | copy |
Triggered when the user copies content. |
cut |
Triggered when the user cuts content. | |
paste |
Triggered when the user pastes content. | |
| Drag & Drop Events | dragstart |
Triggered when the user starts dragging an element. |
dragover |
Triggered when an element is dragged over a valid drop target. | |
drop |
Triggered when an element is dropped onto a valid target. | |
| Other Events | contextmenu |
Triggered when the user right-clicks to open the context menu. |
touchstart |
Triggered when a touch gesture starts (for mobile devices). | |
touchend |
Triggered when a touch gesture ends. | |
| There are many many more events also... | ||
Ways to use Events
Events in JavaScript can be handled in multiple ways, ranging from inline event handlers to advanced event delegation. Below are the different ways you can use events in JavaScript:
1. Inline Event Handlers
This is when you add event handlers directly in the HTML using attributes like onclick, onmouseenter, etc. Write the event attribute in the HTML tag and assign it a JavaScript expression or function call.
Examples:-
                                syntax like:-
                                <button onclick="functionName or code here">Click Me</button>
                                // works on any elements according to attributes

                                //e.g 1:-
                                <button onclick="alert('Clicked!')">Click Me</button>

                                //e.g 2:-
                                <div onmouseenter="this.style.background='blue'"
                                      onmouseleave="this.style.background='white'"
                                      style="width: 100px; height: 100px;">Hover over me</div>
2. Using Event Properties
Select the element with JavaScript and set its event property to a function.
Examples:-
                                <div id="myDiv" style="width: 100px; height: 100px;"></div>

                                //js code:-
                                //1. select element using selectors
                                const div = document.getElementById('myDiv');

                                //2. assign function on events
                                div.onmouseenter = function() {
                                      this.style.background = 'green';
                                };
                                div.onmouseleave = function() {
                                      this.style.background = '';
                                };

                                cons - Overwrites any previous handler for that event (only one function at a time).
3. Using addEventListener() (Best Practice)
The modern, preferred method. You use addEventListener() to attach events programmatically. Select an element and call addEventListener(event, function) to bind the event. Multiple listeners can be added to the same event.
Syntax:-
                                element.addEventListener(event, function);

                                //function youcan declare directly or write function Name
Examples:-
                                <button id="myButton">Click Me</button>

                                //js code
                                const button = document.getElementById('myButton'); //1.select

                                //2. add event Listner
                                button.addEventListener('click', () => {
                                      alert('First click action!');
                                });
                                //second event Listner on same element(can be multiple)
                                button.addEventListener('click', () => {
                                      console.log('Second click action!');
                                });
Examples:-
                                Using named functions makes it easier to remove event listeners.

                                <button id="btn">Click Me</button>

                                // js code
                                function handleClick() {
                                      alert("Button Clicked!");
                                }
                                //1. select
                                let btn = document.getElementById("btn");

                                //2. use event listner and assign named function
                                btn.addEventListener("click", handleClick); //not use () here

                                // Remove event listener if want
                                btn.removeEventListener("click", handleClick);
4. Event Delegation(Handling Multiple Elements)
Instead of adding individual event listeners to multiple elements, use event delegation by adding a single event listener to a parent element. More efficient for dynamically added elements
Example:-
                                <ul id="list">
                                      <li>Item 1</li>
                                      <li>Item 2</li>
                                      <li>Item 3</li>
                                </ul>

                                //js code
                                document.getElementById("list").addEventListener("click",function (event) {
                                      if (event.target.tagName === "LI") {
                                            alert("You clicked on " + event.target.textContent);
                                      }
                                });


                                event.target: This refers to the exact element that was clicked.
                                tagName Property: returns the tag name of the clicked element in uppercase
There are many other ways to use Events...
this keyword in Event Listners
event listener's this keyword refers to the same element that triggered the event (i.e., the element to which the event listener is attached).
Example:-
                                <button id="btn">Button</button>
                                <p id="pera">Peragraph</p>

                                //common function for any element using this
                                function handleClick() {
                                      alert("You clicked on " + this.textContent);
                                      // 'this' refers to the element that triggered the event
                                }

                                document.getElementById("btn").addEventListener("click", handleClick);
                                document.getElementById("pera").addEventListener("click", handleClick);


                                //console.log 'this' just for explanation that what it refers to
                                <div id="div">Div</div>
                                div.getElementById("div").addEventListener("click", function() {
                                      console.log(this); //Output: <div id="div">Div</div>
                                });
event Object
The event object in JavaScript is an automatically passed argument in event handlers that contains details about the event (such as the type of event, the target element, and additional properties related to the specific event type). e.g - MouseEvent, KeyboardEvent, PointerEvent e.t.c depending on the type of event.
| Property | Description |
|---|---|
event.type |
Returns the event type (e.g., "click", "keydown"). |
event.target |
Returns the element that triggered the event. |
event.currentTarget |
Returns the element where the event listener is attached. |
event.clientX & event.clientY |
Mouse position (X, Y) relative to the viewport. |
event.pageX & event.pageY |
Mouse position relative to the full page. |
event.key |
Returns the key pressed (for keyboard events). |
event.code |
Returns the physical key code (for keyboard events). |
event.altKey, event.ctrlKey, event.shiftKey |
Returns true if these modifier keys were held. |
event.preventDefault() |
Prevents the default action of an event (e.g., stopping form submission). |
event.stopPropagation() |
Stops the event from bubbling up to parent elements. |
Example:-
                                //exmample related to keywoard events
                                <input type="text" id="inputBox" placeholder="Type something..." />

                                let input = document.getElementById("inputBox");
                                document.addEventListener("keydown", function(event) {
                                      console.log(event.key); //output like "a", "z" e.t.c
                                      console.log(event.code); //output like "keyA", "keyZ","ArrowDown" e.t.c
                                });


                                //practical example
                                let inp = document.querySelector("inputBox");
                                inp.addEventListener("keydown", function (event) {
                                      if (event.code === "KeyU") {
                                            console.log("Character moves up");
                                      } else if (event.code === "KeyD") {
                                            console.log("Character moves down");
                                      } //e.t.c
                                });
used to track user interactions like key presses, mouse actions, form submissions, scrolling, and more. e.g - in games we have to track ArrowDown, ArrowUp e.t.c
preventDefault()
The preventDefault() method prevents the default behavior of an event in JavaScript.It is commonly used in forms, links, key presses, and context menus.
Use Cases: Prevent form submission, Disable right-click menu, Block copy-paste e.t.c many more things that done by default after a event occurs.
Example:-
                                <form id="myForm" action = "/action">
                                      <input type="text" id="name" placeholder="Enter Name">
                                      <button type="submit">Submit</button>
                                </form>

                                let form = document.getElementById("myForm");

                                //e.g to prevent form submitting blank name
                                form.addEventListener("submit", function (event) {
                                      let name = document.getElementById("name").value;
                                      if (name === "") {
                                            event.preventDefault();
                                            alert("Name cannot be empty!");
                                      }
                                });


                                //e.g clicking the link won't navigate to the URL
                                document.querySelector('a').addEventListener('click', (event) => {
                                      event.preventDefault();
                                      console.log('Link click prevented!');
                                });


                                //there are many more use cases...
Event Bubbling
When an event (like a click, mouseover, etc.) occurs on an element, it doesn't just affect that element—it "bubbles up" through its parent elements, all the way to the root of the DOM (usually the document or window object), unless stopped.
Stopping Bubbling: Use event.stopPropagation() to prevent the event from bubbling up further.
Example:-
                                //Without stopPropagation
                                <div onclick="console.log('Div clicked')">
                                      <button onclick="console.log('Button clicked')">Click me</button>
                                </div>
                                //Output like: If you click the button:
                                "Button clicked" logs first (target element).
                                "Div clicked" logs second (parent element), because the event bubbles up.


                                //Stop Bubbling(with stopPropagation)
                                button.addEventListener('click', (e) => {
                                      console.log('Button clicked');
                                      e.stopPropagation(); // Stops the event from reaching the parent
                                });
                                //Now if button pressed only "Button clicked" logs
If you don't define an event listener on the parent, event bubbling still occurs, but nothing will happen at the parent level because there's no handler to respond to the event.
Call Stack
Call Stack and Breakpoints
The call stack in JavaScript is a data structure (specifically a LIFO - Last In, First Out stack) that keeps track of function calls in your program. It helps JavaScript manage the order of execution, especially when functions call other functions.
When Function is called JavaScript pushes the function onto the call stack. Once the function completes (returns a value or reaches its end), it's popped off the stack.
Single-Threaded Nature: JavaScript is single-threaded, meaning it can only process one thing at a time. The call stack reflects this by handling one function call at a time.
Visualizing:-
                                function a() {
                                      b();
                                }
                                function b() {
                                      c();
                                }
                                function c() {
                                      console.log("Done!");
                                }
                                a(); //calling a

                                Stack Flow:
                                a() → Stack: [a]
                                b() → Stack: [a, b]
                                c() → Stack: [a, b, c]
                                c() finishes → Stack: [a, b]
                                b() finishes → Stack: [a]
                                a() finishes → Stack: []
                                Output: "Done!"
When a function is removed from the call stack, its execution context, including all variables defined inside it, is typically removed from memory, which is why we cannot access them outside the function.
However, if those variables are referenced by a closure or another persistent reference, they may remain in memory even after the function is popped off the stack.
Breakpoints
Breakpoints are intentional stopping points in your code that you set while debugging. They pause the execution of your JavaScript program at a specific line, allowing you to inspect the state of the program—like variable values, the call stack, and scope—at that moment. They're a key tool in developer tools (e.g., Chrome DevTools, VS Code debugger) to troubleshoot and understand code behavior.
Setting Breakpoints:-
1. In Browser DevTools: Open the "Sources" tab, navigate to your script, and click the line number where you want to pause.
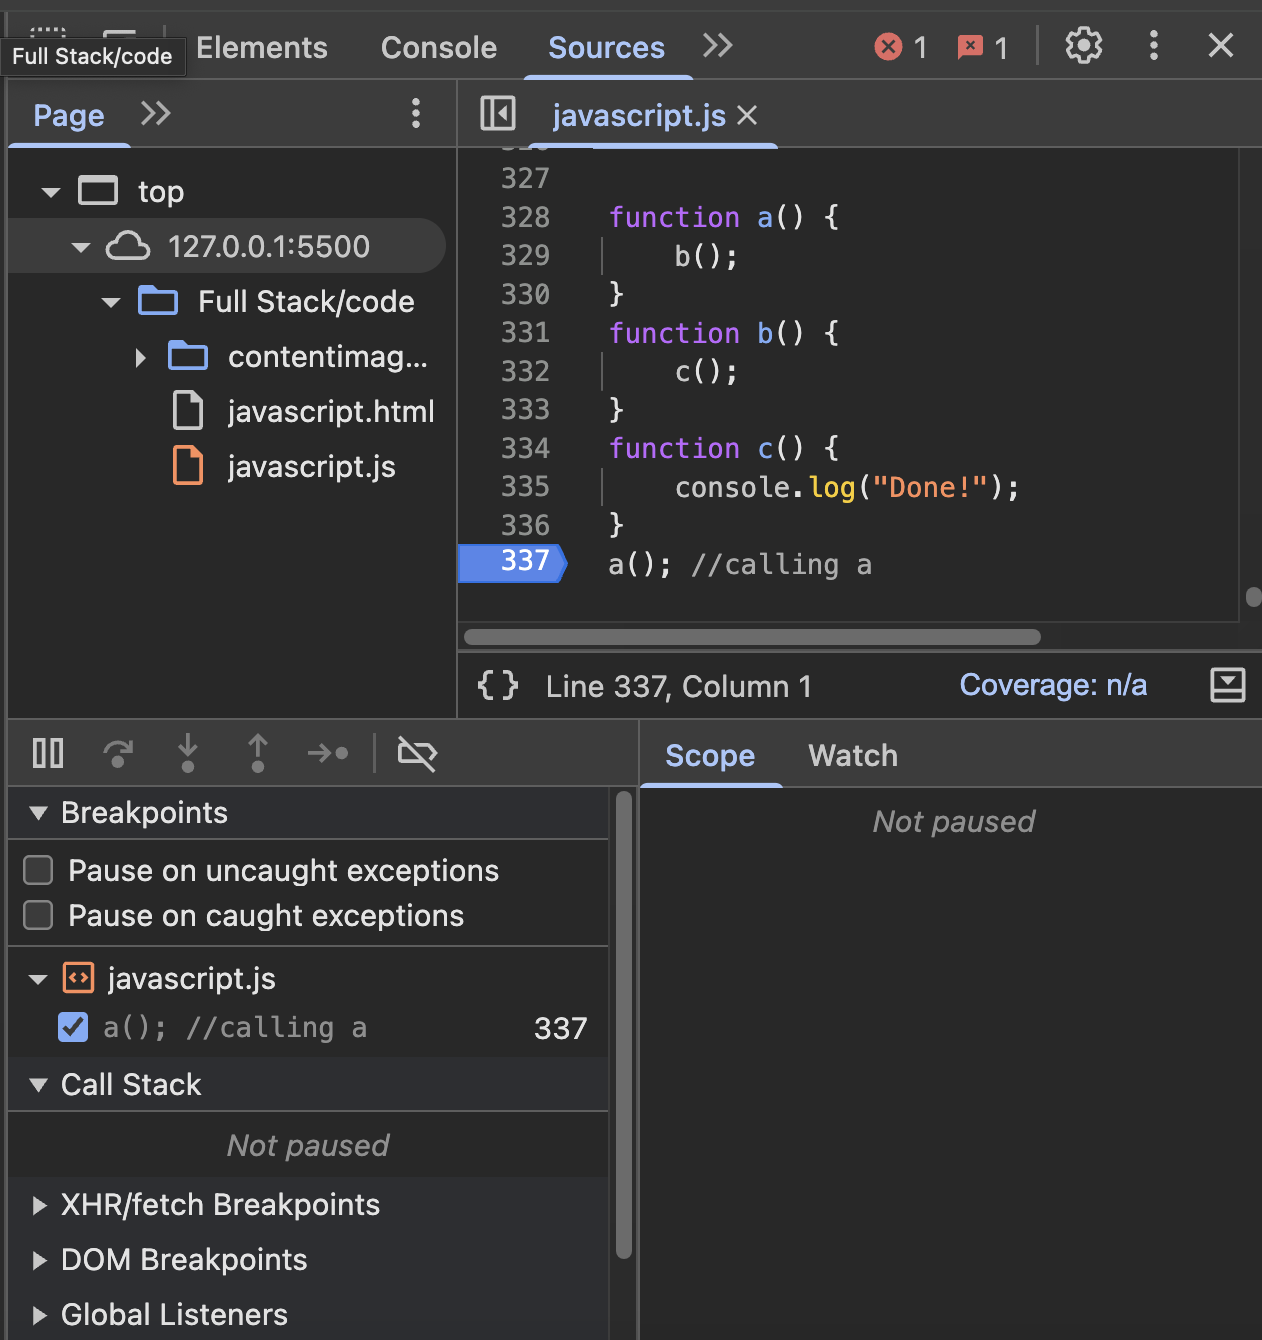
2. Programmatically: Use the debugger statement in your code, which acts like a breakpoint when DevTools is open.
Types of Breakpoints: Line Breakpoint, Conditional Breakpoint, Function Breakpoint, Exception Breakpoint, Watchpoint (Variable Breakpoint). and many other also...
We will study and use breakpoints while debugging...
Single Threaded
Single-Threaded
JavaScript is single-threaded, meaning it has one call stack and can only execute one piece of code at a time. This design simplifies some aspects of programming but introduces challenges, especially when dealing with time-consuming tasks or concurrency.
Event Loop: Asynchronous operations (e.g., timers, network requests) are offloaded to the browser or Node.js runtime, which uses additional threads internally, but the JavaScript code itself runs on one thread via the event loop.
| Blocking the Thread | Long-running synchronous tasks (e.g., heavy computation) block the call stack, freezing the application. |
| Poor Responsiveness | In browsers, a blocked thread prevents UI updates, event handling (e.g., clicks), or animations, leading to a "janky" user experience. |
| Limited Concurrency | You can't run multiple tasks in parallel on the JavaScript thread, unlike multi-threaded languages (e.g., Java). |
| Asynchronous Complexity | To avoid blocking, JavaScript relies on asynchronous patterns (callbacks, promises, async/await), which can lead to "callback hell" or complex code flows. |
| Asynchronous Programming | Offload time-consuming tasks to asynchronous APIs, letting the event loop handle them without blocking the thread. |
| Web Workers (Browsers) |
Run heavy computations in separate threads using Web Workers, which operate outside the main JavaScript thread. How It Works: Workers run in parallel, communicating with the main thread via message |
| Worker Threads (Node.js) | Similar to Web Workers, Node.js offers the worker_threads module for parallel execution. |
| Chunking or Batching | Break long tasks into smaller chunks and process them incrementally using setTimeout or requestAnimationFrame to avoid blocking. |
Callback Hell
Callback hell
Callback hell in JavaScript refers to a situation where multiple nested callbacks make the code hard to read, maintain, and debug. It often happens when dealing with asynchronous operations, like fetching data or handling events, where each step depends on the result of the previous one.
Example:-
                                function step1(callback) {
                                      setTimeout(() => {
                                            console.log("Step 1 completed");
                                            callback();
                                      }, 1000);
                                }

                                function step2(callback) {
                                      setTimeout(() => {
                                            console.log("Step 2 completed");
                                            callback();
                                      }, 1000);
                                }

                                function step3(callback) {
                                      setTimeout(() => {
                                            console.log("Step 3 completed");
                                            callback();
                                      }, 1000);
                                }

                                // Nested Callbacks (Callback Hell)
                                step1(() => {
                                      step2(() => {
                                            step3(() => {
                                                  console.log("All steps completed");
                                            });
                                      });
                                });
Problems with Callback Hell :-
1.Difficult to Read & Maintain - Code becomes messy due to deep nesting.
2.Hard to Debug - If an error occurs, tracing the issue through nested callbacks is difficult.
3.Pyramid of Doom - The nested structure makes the code look like a pyramid, reducing clarity. e.t.c
How to Fix Callback Hell - Promises, Async/Await, Modularize e.t.c
Promises
Promises in JavaScript
A Promise in JavaScript is an object that represents the eventual completion or failure of an asynchronous operation. It helps avoid callback hell and makes asynchronous code more readable.
| State | Description |
|---|---|
| Pending | The operation is still in progress. |
| Fulfilled (Resolved) | The operation completed successfully. |
| Rejected | The operation failed. |
Example:-
                                function saveToDb(data) {
                                      return new Promise((resolve, reject) => {
                                            let internetSpeed = Math.floor(Math.random() * 10) + 1;

                                            if (internetSpeed > 5) {
                                                  resolve("Success: Data was saved");
                                            } else {
                                                  reject("Failure: Weak connection");
                                            }
                                      });
                                }

                                // Testing the Promise
                                saveToDb("User Data");


                                Why Use Promises :-
                                Avoids Callback Hell, Improves Readability, Easier Error Handling e.t.c
                                Promises make asynchronous code more manageable.
.then() and .catch() in Promises
.then() and .catch() are used to handle Promises in JavaScript - .then() Executes when the Promise is resolved (fulfilled), .catch() Executes when the Promise is rejected (failed).
Example:-
                                function fetchData() {
                                      return new Promise((resolve, reject) => {
                                            let success = Math.random() > 0.5; // 50% chance of success
                                            setTimeout(() => {
                                                  if (success) {
                                                        resolve("Data fetched successfully!");
                                                  } else {
                                                        reject("Error: Failed to fetch data!");
                                                  } // we can also skip reject if not needed
                                            }, 1000);
                                      });
                                }

                                // Handling Promise with .then() and .catch()
                                fetchData()
                                      .then((result) => console.log(message))  // Runs if resolved
                                      .catch((error) => console.log(error));   // Runs if rejected

                                // Here, 'result' is the resolve value, and
                                // 'error' is the reject value (both are optional)

                                //Other syntax also possible...
Promise Chaining
Promise chaining is a technique where multiple .then() methods are linked together to execute asynchronous tasks in a sequence.
Example:-
                                function saveToDb(data) {
                                      return new Promise((resolve, reject) => {
                                            let internetSpeed = Math.floor(Math.random() * 10) + 1;

                                            if (internetSpeed > 5) {
                                                  console.log(`"${data}" saved to database`);
                                                  resolve();
                                            } else {
                                                  reject("Promise was rejected: Weak connection");
                                            }
                                      });
                                }

                                // Promise chaining with multiple then() a Single catch()
                                saveToDb("Hello 1")
                                      .then(() => {
                                            console.log("Data1 saved.");
                                            return saveToDb("Hello 2"); // Returning ensures chaining
                                      })
                                      .then(() => {
                                            console.log("Data2 saved."); //we can use multiple then()
                                            return saveToDb("Hello 3");
                                      })
                                      .then(() => {
                                            console.log("Data3 saved.");
                                      })
                                      .catch(() => {
                                            console.log("Promise was rejected."); // Handles errors for all
                                      });

                                    If any step fails, .catch() runs and stops further execution, meaning any steps after the rejected promise will not run.
                                    // we can also skip catch() if not needed

                                //Other syntax also possible...
Async Functions
async and await
An async function is a special type of JavaScript function that always returns a Promise, whether you explicitly return one or not. An async function lets you write asynchronous code that looks and behaves like synchronous code using the await keyword.
Syntax:-
                                async function functionName() {
                                      // you can use await inside here
                                }
                                //syntax like normal functions just use async keyword before

                                //Other syntax also possible...
Example:-
                                async function sayHi() {
                                      return "Hi there!";
                                }

                                sayHi().then(value => console.log(value)); // "Hi there!"
                                //If you return a plain value , JS wraps it in a resolved promise.

                                // Or get value in another async function:
                                async function main() {
                                      let message = await sayHi();
                                      console.log(message); // "Hi there!"
                                }
                                main();
await keyword - The await keyword can only be used inside an async function.
It tells JS to: Wait for the Promise to resolve, Then move to the next line of code.
It lets you wait for a promise to resolve without nesting .then() calls.
Example:-
                                async function getData() {
                                      let data = await fetchData();
                                      console.log(data); // runs after fetchData() is resolved
                                }

                                //we can also use await without assigning it to a variable!
                                //like - await fetchData();


                                //await makes asynchronous code behave like synchronous code
                                //easier to write and read!
Handling Rejections
Async functions handle errors gracefully with try...catch, just like synchronous code:
Syntax:-
                                async function mightFail() {
                                      try {
                                            let response = await fetch("https://bad-url.com");
                                            let data = await response.json();
                                            return data;
                                      } catch (error) {
                                            console.error("Oops:", error);
                                      }
                                      //other code here
                                }
                                //If we don't handle errors properly, the rest of the code may not execute when an error occurs.
APIs
API
An API (Application Programming Interface) is a set of rules that allows one software application to communicate with another. It defines how requests and responses should be structured, making integration between different systems possible.
How They Work
- An API exposes specific "endpoints" (like URLs or functions) that a program can call.
- You send a request (e.g., "Give me the weather for New York") in a format the API understands (often HTTP with JSON or XML).
- The API processes it and sends back a response (e.g., "It's 72°F and sunny").
Sending Requests
Sending a request means your application (client) contacts a server (API) and asks for something — like data, a save operation, update, or deletion. The server then responds with data or a status.
1. fetch()
fetch() is a JavaScript function built into modern browsers that allows you to make HTTP requests to fetch resources (like data, images, etc.) from a server or API. It returns a Promise.
Syntax:-

                                Using Javascript fetch():-

                                let url = "https://catfact.ninja/fact";

                                fetch(url) // [1]
                                .then((res) => {
                                      console.log("Raw Response:", res); // [2]
                                      return res.json(); // [3]
                                })
                                      .then((data) => {
                                      console.log("Cat Fact:", data.fact); // [4]
                                })
                                      .catch((err) => {
                                      console.log("ERROR -", err); // [5]
                                });

                                //Explanation:-
                                1. fetch(url) - What it does: Sends a GET request, What you get: A Promise that resolves to a Response object.

                                2. .then((res) => { ... }) - res is the Response object.
                                console.log("Raw Response:", res); will output:
                                Raw Response: Response { type: 'cors', url: 'https://catfact.ninja/fact', status: 200, ... }

                                3. return res.json();
                                Converts the response body from JSON into a usable JavaScript object.
                                Returns another Promise, which resolves to the actual data.

                                4. .then((data) => { ... })
                                data is the parsed JSON object from the API.
                                You'll get something like:
                                {
                                      "fact": "Cats sleep for 70% of their lives.",
                                      "length": 35
                                }

                                console.log("Cat Fact:", data.fact); outputs:
                                Cat Fact: Cats sleep for 70% of their lives.

                                5. .catch((err) => { ... }) - Catches any network error
Example 2:-
                                Javascript fetch() with async and await:-

                                let url = "https://catfact.ninja/fact";

                                async function getFacts() {
                                      try {
                                            let res = await fetch(url);
                                            let data = await res.json();
                                            console.log("Fact 1:", data.fact);
                                      } catch (e) {
                                            console.log("error -", e);
                                      }
                                }

                                getFacts();
2. axios()
Axios is a JavaScript library used to send HTTP requests from the browser or Node.js to a server or API. It automatically parses json data.
we need to install it (using - npm install axios)
OR add this <script src="https://cdn.jsdelivr.net/npm/axios/dist/axios.min.js"></script>
Example:-
                                const axios = require('axios'); // Only in Node.js, not needed in browser

                                let url = "https://catfact.ninja/fact";

                                axios.get(url)
                                .then((response) => {
                                      console.log("Response:", response.data.fact); //It automatically parses
                                })
                                .catch((error) => {
                                      console.log("Error:", error);
                                });


                                example sending headers using asios:-

                                const url = "https://icanhazdadjoke.com/";
                                async function getJokes() {
                                      try {
                                            // make object with key - headers, and in value make another object
                                            const config = { headers: { Accept: "application/json"} };

                                            //pass headers object as 2nd argument
                                            let res = await axios.get(url, config);
                                            console.log(res.data);
                                      } catch (err) {
                                            console.log("Error:", err);
                                      }
                                }
Types of APIs
- Web APIs: Most common today, accessed over the internet (e.g., Twitter API, Google Maps API).
- RESTful APIs: A popular style of web API using standard HTTP methods (GET, POST, etc.), known for being simple and scalable.
- Library APIs: Built into programming languages or frameworks (e.g., Python's os module).
- Operating System APIs: Let apps interact with your computer (e.g., Windows API).
- Operating System APIs: APIs provided by the OS (e.g., Windows API, Linux syscalls). other type may also
How Developers Use APIs
- Get an API key: (if required) to authenticate requests.
- Read the API's documentation: to learn its endpoints and rules.
- Write code to send requests: (e.g., using JavaScript's Fetch API, Python's requests library etc., to send requests and handle responses).
API testing tools
- Postman - A very popular and beginner-friendly tool used to test RESTful APIs. Supports GET, POST, PUT, DELETE requests and more. You can also automate tests and save collections.
- Hoppscotch - A fast, open-source alternative to Postman. Web-based, supports REST, GraphQL, and WebSocket testing. No need to download/sign up can use directly for quick usage.
- There are many more tools also we can learn them accordingly...
Why They're Useful and Real-World Examples
Efficiency: Developers can use pre-built services instead of coding everything from scratch.
Interoperability: Apps can share data—like how your weather app pulls data from a weather service.
Modularity: Keeps systems separate but connected, making updates easier.
Examples: Social Media(e.g X API lets developers pull posts or user info), Maps(e.gGoogle Maps API lets apps show locations or calculate routes), Payments(e.g Stripe's API lets websites process credit card payments), e.t.c
JSON
JSON
JSON stands for JavaScript Object Notation. It is a lightweight data-interchange format, easy for humans to read and write and easy for machines to parse and generate. JSON is often used to exchange data between a client and a server in web applications.
File extension - .json
JSON Syntax Rules
- Data is in name/value pairs.
- Data is comma-separated.
- Curly braces
{}hold objects. - Square brackets
[]hold arrays. - Names (keys) must be strings (in double quotes).
- Values can be:
- String (
"text") - Number, Float (
10,3.14) - Object (
{}) - Array (
[]) - Boolean (
trueorfalse) - null
- String (
Example:-
                                {
                                      "name": "Jonn",
                                      "age": 32,
                                      "isStudent": true,
                                      "skills": ["HTML", "CSS", "JavaScript"],
                                      "address": {
                                            "city": "Jalandhar",
                                            "state": "Punjab"
                                      }
                                }

                                //generally like in one-line
                                {"id": 101, "name": "John", "isStudent": true, "score": 88.5}
JSON vs JavaScript Object
| Feature | JSON | JavaScript Object |
|---|---|---|
| Quotes on keys | Required | Optional |
| Comments | Not allowed | Allowed |
| Single quotes | Not allowed | Allowed |
| Data format | Text only | Executable code structure |
Accessing JSON Data
When data comes from an API, it usually arrives in string format — even though it looks like a JavaScript object. To use it, we must convert it into an actual JavaScript object.
like:-
                                let JsonResponse = '{"id": 101, "name": "John", "score": 88.5}'
JSON.parse()
JSON.parse() is a JavaScript method that takes a JSON string and converts it into a JavaScript object so that you can access it like javascript object.
Example:-
                                const jsonString = '{"name": "John", "age": 20}';
                                const data = JSON.parse(jsonString);

                                console.log(data); // Output: {"name": "John", "age": 20}
                                console.log(data.age);  // Output: 20


                                //use it when you receive data from an API (because it's usually in string format).
JSON.stringify()
JSON.stringify() is a JavaScript method that takes a JavaScript object and converts it into a JSON string so that it can be sent to a server or stored.
Example:-
                                const user = {
                                      name: "John",
                                      age: 20
                                };

                                const jsonString = JSON.stringify(user);
                                console.log(jsonString);  // Output: '{"name":"John","age":20}'


                                //use it when you want to send data to a server or save it in local storage.
Ajax
Ajax
AJAX (Asynchronous JavaScript and XML) is a technique used in web development to send and receive data from a server without reloading the entire page. Despite the name, AJAX can work with JSON, XML, HTML, or plain text — not just XML.
Key features of Ajax
- Allows web pages to update dynamically
- Avoids full page reload
- Communicates with the server in the background
- Often used in forms, search suggestions, live updates, etc.
Example:-
                                const xhr = new XMLHttpRequest();
                                xhr.open('GET', 'https://api.example.com/data');
                                xhr.onload = function () {
                                      if (xhr.status === 200) {
                                            console.log(xhr.responseText); // usually JSON
                                      }
                                };
                                xhr.send();


                                //Modern Way: AJAX with fetch()
                                fetch('https://api.example.com/data')
                                      .then(response => response.json())
                                      .then(data => console.log(data))
                                      .catch(error => console.error('Error:', error));
HTTP Verbs/ Status Codes
HTTP Verbs
HTTP verbs (also called HTTP methods) define the type of action you want to perform on a resource when communicating with a web server (usually via an API).
Common HTTP Verbs & Their Purpose:
- GET: Retrieve data from the server (e.g., get a list of users).
- POST: Send data to the server to create a new resource (e.g., add a new user).
- PUT: Update an existing resource completely (e.g., replace user details).
- PATCH: Update part of a resource (e.g., change just the user's email).
- DELETE: Remove a resource from the server (e.g., delete a user).
- there are other also...
HTTP Status Codes
HTTP status codes are 3-digit responses from the server that tell the client (browser or API) what happened with the request — whether it succeeded, failed, or something else.
| Status Code Range | Description |
|---|---|
| 1xx - Informational | Request received, continuing process (e.g., 100 Continue). |
| 2xx - Success | The request was successfully received, understood, and accepted (e.g., 200 OK). |
| 3xx - Redirection | Further action must be taken (e.g., 301 Moved Permanently). |
| 4xx - Client Error | The request contains bad syntax or cannot be fulfilled (e.g., 404 Not Found). |
| 5xx - Server Error | The server failed to fulfill a valid request (e.g., 500 Internal Server Error). |
| Status Code | Description |
|---|---|
| 200 OK | Request was successful. |
| 201 Created | Resource successfully created (e.g., after a POST request). |
| 204 No Content | Request succeeded, but there is no content to return. |
| 301 Moved Permanently | Resource has been moved to a new URL. |
| 400 Bad Request | The request was invalid or cannot be served. |
| 401 Unauthorized | Authentication required or failed. |
| 403 Forbidden | You don't have permission to access the resource. |
| 404 Not Found | The requested resource could not be found. |
| 500 Internal Server Error | A generic error occurred on the server. |
| 503 Service Unavailable | Server is temporarily overloaded or down. |
Add information in URLs
APIs often use URLs to define endpoints, and information can be added to URLs in several ways, depending on the API's design.
Path Parameters
Path parameters are placeholders in the URL path that represent specific resources or identifiers.
Use Case: Accessing a specific resource (e.g., a user by ID).
Example:-
                                Syntax: /resource/{id}

                                GET https://api.example.com/users/123
                                Here, 123 is the user ID, identifying a specific user.
Query Parameters
Query parameters are key-value pairs appended to the URL after a ?, separated by &. They're commonly used for filtering, sorting, or optional settings.
Use Case: Filtering results, pagination, or specifying options.
Example:-
                                Syntax: ?key1=value1&key2=value2 e.t.c

                                Example:
                                GET https://api.example.com/users?role=admin&limit=10&sort=name
You can combine path and query parameters for complex requests.
We can manipulate an API link using variable query strings by dynamically adding key-value pairs in the URL based on user input or variables in your code.
Example:-
                                let url = "http://universities.hipolabs.com/search?country=";
                                let country = "Nepal"; //we can also get this variable from user e.t.c.

                                async function getColleges() {
                                      try {
                                            let res = await axios.get(url + country);
                                            console.log(res.data); // Just log the result data
                                      } catch (e) {
                                            console.log("Error:", e);
                                      }
                                }
HTTP Headers
HTTP headers are key-value pairs sent in the request or response of an HTTP transaction. In API requests, headers provide metadata about the request, such as:
- Authentication credentials (e.g., API keys, tokens).
- Content type of the request or response (e.g., JSON, XML).
- Instructions for caching, compression, or behavior.
- Unlike URL parameters or the request body, headers are not part of the URL but are included in the HTTP request's header section.
- They're essential for secure and efficient API communication.
Example:-
                                fetch('/api/data', {
                                      method: 'GET',
                                      headers: {
                                            'Authorization': 'Bearer YOUR_TOKEN',
                                            'Accept': 'application/json'
                                      }
                                });
In Console:-

JavaScript OOPS
Object-Oriented Programming (OOP) in JavaScript is a programming paradigm that uses objects and classes to structure code in a modular and reusable way.
Core OOP Concepts
- Encapsulation: Bundling data (properties) and methods (functions) that operate on that data into a single unit (object or class), restricting direct access to some of an object's components.
- Inheritance: A mechanism where one class inherits properties and methods from another, promoting code reuse.
- Polymorphism: The ability of different classes to be treated as instances of the same class through a common interface (e.g., method overriding).
- Abstraction: Hiding complex implementation details and exposing only the necessary parts to the user.
Some Benefits of OOPs in JavaScript includes:
- Improved code organization (structure of code)
- Reusability of code
- Better maintainability of code
- Closeness to real-world objects
Object Prototypes
In JavaScript, object prototypes are a core mechanism for implementing inheritance and sharing properties and methods between objects. JavaScript is a prototype-based language, meaning objects can inherit directly from other objects via their prototype chain.
Every JavaScript object has an associated prototype object, which it can inherit properties and methods from. The prototype is referenced via the internal [[Prototype]] property (accessible via Object.getPrototypeOf() or the deprecated __proto__). Prototypes enable inheritance, allowing objects to share behavior without duplicating code.
The prototype is itself an object, so the prototype will have its own prototype, making what's called a prototype chain. The chain ends when we reach a prototype that has null for its own prototype.
Without Prototypes example
Example:-
                                let arr1 = [1, 2, 3];
                                let arr2 = [1, 2, 3];
                                arr1.sayHello = () => {
                                      console.log ("hello!, i am arr");
                                };
                                arr2.sayHello = () => {
                                      console.log("hello!, i am arr");
                                };

                                arr1.sayHello === arr2.sayHello //Output: false


                                //what if we access prototype methods:-
                                'A'.toUpperCase === 'a'.toUpperCase //Output: true
                                // as both method refer to same function
arr.__proto__ (Reference to the Prototype)
arr.__proto__ is a reference to Array.prototype, the prototype object for all arrays. Array.prototype contains methods like push, pop, slice, forEach, etc., which all arrays inherit.
Array.prototype.__proto__ is Object.prototype (since Array.prototype inherits from Object.prototype).
We can modify predefined methods also:-
                                // Create an array
                                const arr = [1, 2];

                                // Modify the push method on Array.prototype
                                arr.__proto__.push = function(n) {
                                      console.log("pushing number : ", n);
                                };

                                arr.push(3); //Output: pushing number : 3;
                                //we can modify like this e.t.c.
datatype.prototype
In JavaScript, every constructor function for a built-in data type (e.g., Array, String, Number, etc.) has a prototype property, which is an object. (e.g., Array.prototype, String.prototype e.t.c, that holds the shared functionality for objects of that type.)
                                Array.prototype - Contains array methods like push(), pop(), map(), filter(), etc.
                                //example:-
                                const arr = [1, 2];
                                console.log(arr.__proto__ === Array.prototype); // true
                                console.log(Array.prototype.map); // [Function: map]


                                String.prototype - Contains string methods like toUpperCase(), slice(), charAt(), etc.
                                //example:-
                                const str = 'hello';
                                console.log(str.__proto__ === String.prototype); // true
                                console.log(String.prototype.toUpperCase); // [Function: toUpperCase]

                                //there are other also...
Factory Functions
Factory Functions
A factory function is just a normal function that returns an object.
Basic Syntax:-
                                function createUser(name, age) {
                                      const person =  {
                                            name: name,
                                            age: age,
                                            greet: function () {
                                                  console.log(`Hi, I am ${name}`);
                                            }
                                      };
                                      return person; //return a object
                                }

                                //Usage:
                                const user1 = createUser("Inderjit", 20);
                                const user2 = createUser("Adam", 25);

                                user1.greet(); // Hi, I am Inderjit
                                user2.greet(); // Hi, I am Adam
Not commonly Used - As No automatic prototype sharing, So Each object returned by the factory has its own copy of methods. This wastes memory if many objects share the same method.
Constructor Function , new keyword
Constructor Functions
A constructor function is a regular function used to create multiple objects of the same type using the new keyword.
Basic Syntax:-
                                function User(name, age) {
                                      this.name = name;
                                      this.age = age;
                                      this.greet = function () {
                                            console.log("Hi, I am " + this.name);
                                      };
                                }

                                //Usage:
                                const user1 = new User("Inderjit", 20); //use new operator like this
                                const user2 = new User("Aman", 25);

                                user1.greet(); // Hi, I am Inderjit
                                user2.greet(); // Hi, I am Aman

                                console.log(user1.__proto__ === User.prototype); // true
                                console.log(user1 instanceof User); // true

                                user1.greet === user2.greet //true - as both point to the same function in memory.
new Keyword
The new keyword is used to invoke a constructor function, creating a new object and setting up its prototype chain. When you call a function with new, JavaScript performs the following steps:
- Creates a new empty object: {}
- Sets the prototype: newObj.__proto__ = User.prototype
- Binds this: Sets this to the new object within the constructor function.
- Executes the Constructor: Runs the constructor function, initializing the object with properties/methods.
- Returns the Object: Implicitly returns the new object (unless the constructor explicitly returns another object).
Classes
A class in JavaScript is a blueprint for creating objects with shared structure and behavior (properties and methods).
Introduced in ES6, it's syntactic sugar over JavaScript's existing prototype-based inheritance. Similar like constructor functions, but with a more intuitive syntax inspired by object-oriented programming (OOP) languages like Java or C++.
Syntax: Uses class keyword, with a constructor method for initialization and other methods defined within the class body.
Constructor: Special method to initialize object properties.
Methods: Defined without function keyword; automatically go to .prototype.
Basic Syntax and Structure:-
                        class Person {
                              constructor(name, age) { //constructor method
                                    this.name = name;
                                    this.age = age;
                              }

                              greet() { //we can define methods like this
                                    return `Hi, I'm ${this.name}!`;
                              }
                        }

                        let alice = new Person('Alice', 25); //use new keyword to make objects
                        let bob = new Person('Alice', 25); //use new keyword to make objects
                        console.log(alice.greet()); // Hi, I'm Alice!
                        console.log(alice.__proto__ === Person.prototype); // true

                        alice.greet === bob.greet //true - as both are same function
                        Methods are shared (not recreated for every object).
Inheritance
Inheritance allows one class (child) to access the properties and methods of another class (parent). It promotes code reuse.
Syntax using class and extends:-
                        class Parent {
                              constructor(name) {
                                    this.name = name;
                              }

                              greet() {
                                    console.log("Hello, I am " + this.name);
                              }
                        }

                        class Child extends Parent {
                              constructor(name, age) {
                                    super(name); // calls Parent constructor
                                    this.age = age;
                              }

                              showAge() {
                                    console.log("I am " + this.age + " years old.");
                              }
                        }


                        const obj = new Child("Inderjit", 20);

                        obj.greet(); // Hello, I am Inderjit (inherited from Parent)
                        obj.showAge(); // I am 20 years old. (Child method)
extends sets up inheritance.
super() is used to call the parent class constructor.
Inherited methods come from the prototype chain.
Child class can override parent methods if needed, like:-
Overriding methods-
                        // Parent class
                        class Animal {
                              constructor(name) {
                                    this.name = name;
                              }

                              speak() {
                                    console.log(`${this.name} makes a sound.`);
                              }
                        }


                        // Child class
                        class Dog extends Animal {
                              constructor(name, breed) {
                                    super(name); // Call parent constructor
                                    this.breed = breed;
                              }

                              // Overriding speak() method
                              speak() {
                                    console.log(`${this.name} barks.`);
                              }
                        }


                        const a = new Animal("Animal");
                        a.speak(); // Output: Animal makes a sound.

                        const d = new Dog("Tommy", "Labrador");
                        d.speak(); // Output: Tommy barks.


                        Use of super.speak():-
                        speak() {
                              super.speak(); // Calls Animal's speak()
                              console.log(`${this.name} also barks.`);
                        }

                        //Output like:--
                        Tommy makes a sound.
                        Tommy also barks.
super.methodName() → to call a method from the parent class.